

You are using an out of date browser. It may not display this or other websites correctly.
You should upgrade or use an alternative browser.
You should upgrade or use an alternative browser.
Glacier White 200 Cup
- Thread starter burrellbloke
- Start date
burrellbloke
Paid Member
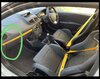
Amazing. Those yellow seatbelts are the best!
Thanks - I am hoping that the exhaust proves to be one of the better upgrades.
The belts were from eBay. I think the seller is on Instagram going by the name of HouseofBelts or something similar. Very helpful chap.
burrellbloke
Paid Member
Thank you Daniel. I did a bit of research before I bought the Akra and got the impression that the pre-cat in the standard manifold would be enough to pass the emissions test. It is good to hear that you have had no problems - it makes me a bit more confident for when the MOT is due next year.
Daniel_S
Paid Member
No problem. I was concerned, even after reading the pre cat in the manifold was sufficient come MOT.
Anyway, mine flew through no issues at all with emissions testing. So enjoy the new exhaust, its a fabulous edtion to the car. Fantastic noise with out being over powering / droney, showering my age now
Anyway, mine flew through no issues at all with emissions testing. So enjoy the new exhaust, its a fabulous edtion to the car. Fantastic noise with out being over powering / droney, showering my age now
burrellbloke
Paid Member
Bloody weather.
In between working from home today I wanted to tinker with the car. Now it is pouring down with rain. Typical.
I had planned on washing the car and trying to treat some of the really superficial rust spots in the engine bay. There is a tiny amount of oxidisation on the acoustic valve bracket and the lower engine mount that I wanted to deal with.
I had acquired some CarPro IronX paste and a can of ACF50 in the week.
Hopefully storm Aiden will pass and leave us with some good weather for a change.
burrellbloke
Paid Member
Storm Aiden did bugger off today. All I managed ot achieve was replacing one single solitary black plastic cap that goes on top of the standard Renault mats on the drivers side. When I had the car cleaned last week at the hand wash they obviously ripped out the mats and did not notice the clip, or did not bother to look for it properly.
I paid £10 for a replacement. It came in a bag which contained an assortment of mat clips and fittings.

£10 Was rather expensive for one single clip. At least I am now well stocked for any further caps going missing.
I paid £10 for a replacement. It came in a bag which contained an assortment of mat clips and fittings.
£10 Was rather expensive for one single clip. At least I am now well stocked for any further caps going missing.
EthanMenace
Paid Member
The Clio was very dirty after travelling to K-Tec and back for the new exhaust and I had today off work so I gave it a bit of a clean.


It scrubbed up alright


I took it for a quick hoon once it was clean. The exhaust is sounding really good, the occasional pop and gurgle is brilliant. Much better than stock.
In Clio 182 Trophy news, my KTR Induction kit arrived so I got that fitted as well. Bit of a tighter fit than the 200 but sounds much deeper at full throttle so I'm happy with that as well. Please ignore my dirty and untidy engine bay


It scrubbed up alright
I took it for a quick hoon once it was clean. The exhaust is sounding really good, the occasional pop and gurgle is brilliant. Much better than stock.
In Clio 182 Trophy news, my KTR Induction kit arrived so I got that fitted as well. Bit of a tighter fit than the 200 but sounds much deeper at full throttle so I'm happy with that as well. Please ignore my dirty and untidy engine bay
Attachments

The open cones do sound great on the 182s, half tempted to get a ktec kit for the 197 myself!
EthanMenace
Paid Member
it's one of my favourite mods! Would definitely recommend.The open cones do sound great on the 182s, half tempted to get a ktec kit for the 197 myself!
burrellbloke
Paid Member
I took a drive to The Car Studio in Witham to have my paintwork checked over today. I e-mailed Ian last night about getting a quote for paint correction. He sent me a reply nice and early today to say that if I brought the car down he would have a look at it. I popped over to his place and he had a look at the Clio and told me that it does not look like it needs any paint correction work but he was happy to arrange a booking for a deep clean and de-contamination together with a protective coating for a very reasonable price. Hopefully he can get rid of the tar marks on my car that I cannot shift.
Ian is a member here but I could not find his username - lovely chap. We had a chat about Renualts, track days and he showed me some photos of his current 172 project.
It was refreshing to speak to someone who was not trying to sell me products that I did not need.
The Clio is going to be put to work over the next two weeks with proper commuting duties as various cars in my household are either booked in for servicing or other work. I plan on getting Ian to clean up the Clio in about 2 weeks time.
Enjoyed reading through this thread. Attention to detail and a clear direction. Very nice car.
burrellbloke
Paid Member
Thanks Ben.
I am looking forward to taking the Clio out for a track day in December (it was moved from November due to lockdown 2.0) to see how the car performs. Next year the plan is to get some coil overs and do some more track days. I am sure along the way there will be some more cosmetic changes - maybe a cup spoiler and some track day wheels with some new rubber.
I am looking forward to taking the Clio out for a track day in December (it was moved from November due to lockdown 2.0) to see how the car performs. Next year the plan is to get some coil overs and do some more track days. I am sure along the way there will be some more cosmetic changes - maybe a cup spoiler and some track day wheels with some new rubber.
burrellbloke
Paid Member
I had a few hours spare today so I decided to take off the rear light clusters and give the bodywork a clean underneath.

I am not sure that anyone had ever cleaned behind the light clusters before.

After a quick scrub with some Autoglym shampoo with a sponge and a bucket of hot water most of the dirt came off. I then used some Meguiars Ultimate Compound to get the grime off of the paintwork.

It was quite a satisfying task until I tried to get some of the dirt out of the light clusters. There is a thin recess at the edge of the light cluster. I used a wooden barbecue skewer to got some of the dirt out.

I then struggled ot get the rest of the dirt out. After 15 minutes of poking thin objects in to the recess I gave up. Now all I can see when I look at the rear lights is a small line of dirt that I never noticed before.
I am not sure that anyone had ever cleaned behind the light clusters before.
After a quick scrub with some Autoglym shampoo with a sponge and a bucket of hot water most of the dirt came off. I then used some Meguiars Ultimate Compound to get the grime off of the paintwork.
It was quite a satisfying task until I tried to get some of the dirt out of the light clusters. There is a thin recess at the edge of the light cluster. I used a wooden barbecue skewer to got some of the dirt out.
I then struggled ot get the rest of the dirt out. After 15 minutes of poking thin objects in to the recess I gave up. Now all I can see when I look at the rear lights is a small line of dirt that I never noticed before.
burrellbloke
Paid Member
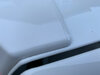
I had noticed a line of green algae building up under my GT spoiler and decided to tackle the spoiler today.

The dirt had been building up under the GT spoiler all along the tail gate.

@turkie172 Had helpfully told me how to take my GT spoiler off last week. I followed his instructions and removed the two torx screws. I then tried to prod in a screw driver in to the two small holes on the underside of the spoiler at either side of the car but I could not feel much movement. I then used a small allen key and poked the shorter part of the allen key in to the hole and it worked perfectly to release the plastic tabs. The top side of the spoiler then came free and after unplugging the centre brake light I took off the top part of the GT spoiler.

It was fairly grubby underneath where the spoiler had been for 10 years. Two metal clips were rusting on the plastic part of the spoiler that attaches to the tail gate.

I used a bucket of warm water with some Autogylm shampoo and a sponge to get ride of most of the dirt and grime.

I undid the 4 torx screws across the length of the tail gate to remove the black underside of the GT spoiler.
There were some stubborn areas of dirt so I used some Meguiars Ultimate Compound and gave it a good scrub.

Before I put it all back together I gave the white top part of the spoiler a good clean. There is a soft fabric edge that runs along the underside of the white spoiler part to stop it rubbing on the top of the tail gate. That fabric edge was covered in green algae.

When both parts of the spoiler had been reattached and the final two torx screws had been tightened up the spoiler and tail gate looked a lot cleaner.

The green algae has now been banished for the time being.
I had a conversation last week with someone who said a Cup should have a Cup spoiler. I do prefer the cup spoiler look and I am now on the look out for decent quality glacier white tail gate. It seems to be reasonably straight forward to swap out one tail gate for another and then bolt on a Cup spoiler.
I am still trying not to spend money on the Clio after strapping the Akrapovic to it last month. Ethan, the Clio's co-owner, is spending a small fortune on his 182 Trophy at the moment. I will try clean out the dirt from the roof bar things next week.

The dirt had been building up under the GT spoiler all along the tail gate.
@turkie172 Had helpfully told me how to take my GT spoiler off last week. I followed his instructions and removed the two torx screws. I then tried to prod in a screw driver in to the two small holes on the underside of the spoiler at either side of the car but I could not feel much movement. I then used a small allen key and poked the shorter part of the allen key in to the hole and it worked perfectly to release the plastic tabs. The top side of the spoiler then came free and after unplugging the centre brake light I took off the top part of the GT spoiler.
It was fairly grubby underneath where the spoiler had been for 10 years. Two metal clips were rusting on the plastic part of the spoiler that attaches to the tail gate.
I used a bucket of warm water with some Autogylm shampoo and a sponge to get ride of most of the dirt and grime.
I undid the 4 torx screws across the length of the tail gate to remove the black underside of the GT spoiler.
There were some stubborn areas of dirt so I used some Meguiars Ultimate Compound and gave it a good scrub.
Before I put it all back together I gave the white top part of the spoiler a good clean. There is a soft fabric edge that runs along the underside of the white spoiler part to stop it rubbing on the top of the tail gate. That fabric edge was covered in green algae.
When both parts of the spoiler had been reattached and the final two torx screws had been tightened up the spoiler and tail gate looked a lot cleaner.
The green algae has now been banished for the time being.
I had a conversation last week with someone who said a Cup should have a Cup spoiler. I do prefer the cup spoiler look and I am now on the look out for decent quality glacier white tail gate. It seems to be reasonably straight forward to swap out one tail gate for another and then bolt on a Cup spoiler.
I am still trying not to spend money on the Clio after strapping the Akrapovic to it last month. Ethan, the Clio's co-owner, is spending a small fortune on his 182 Trophy at the moment. I will try clean out the dirt from the roof bar things next week.
Attachments
I have a GT/Cup spoiler from a Gordini Clio which I think is Glacier White they can be fitted to standard tailgates with a bit of work
Italian website
LINK for GT spoiler fitting to standard boot
Italian website
LINK for GT spoiler fitting to standard boot
burrellbloke
Paid Member
I would like to get a Cup spoiler - I prefer the "wing" look. But, that is a mod that can wait until next year.
burrellbloke
Paid Member
Today I decided to tackle the dirt under the roof strips. I had noticed that the area under the roof strips looked dirty and was covered in algae when I cleaned the area under the GT spoiler last week. I opened up the latches on either side to undo the plastic lug. It was grim underneath.

Once the plastic lugs were undone both roof strips came off with a little bit of persuasion. The area under the roof strips was filthy with a combination of dirt and algae.

I used a bucket of warm water and some Autoglym shampoo to wash off the area under the roof strips. I used some Auto Finesse fallout remover on the area and rinsed it off with a hose. I then used a stiff bristled brush to get in to some of the very small crevices and remove the last of the dirt. Despite giving the area on each side a good scrub there was still a line of grime left.

I used some Meguiars Ultimate Compound to get the grime off of the paintwork.

The roof strips were given a good srub.

Once everything was clean the roof strips were put back on on the car.

The windscreen wipers are still bugging me in that they only move about 90% of the distance that they should. If I get time I will have a look at the wiper linkage tomorrow.
Once the plastic lugs were undone both roof strips came off with a little bit of persuasion. The area under the roof strips was filthy with a combination of dirt and algae.
I used a bucket of warm water and some Autoglym shampoo to wash off the area under the roof strips. I used some Auto Finesse fallout remover on the area and rinsed it off with a hose. I then used a stiff bristled brush to get in to some of the very small crevices and remove the last of the dirt. Despite giving the area on each side a good scrub there was still a line of grime left.
I used some Meguiars Ultimate Compound to get the grime off of the paintwork.
The roof strips were given a good srub.
Once everything was clean the roof strips were put back on on the car.
The windscreen wipers are still bugging me in that they only move about 90% of the distance that they should. If I get time I will have a look at the wiper linkage tomorrow.
Last edited:
Ppa
Paid Member
CarbonSkins sent me a photo of the parts he has coloured for me. They look really good. I will pick them up on Monday as I have found out that Carbon Skins lives and works very close to
Cana across your updates for the first time last night and thoroughly enjoyed reading and looking at what you’ve been doing
One thing I’ve been toying with is to similarly brand the passenger side trim with “Renault Sport” logo
Yet undecided
That is until I saw yours!
As attached
Could you tell me please how it was done
Is it a decal
Or something else
And where to get
Also how far in (in mm) is it from the left side, what is the measurement from left end to the first big “R”
Thank you
When we got the car it came with two keys. It is a Cup model so it does not have keycards and keyless entry. The car came with a normal fixed key and a 3 button key fob. The key fob had never worked and was falling apart. I tried to recase the key fob using a cheap part from eBay, but the old body and new body did not match. My local Timpsons told me they were not allowed to cut the key on the eBay part as cheap key blades are often poor quality and can break in the ignition. I eventually found a site called FobFix that claimed to be able to repair most key fobs for £25. I sent the parts off that I had from the 3 button key bob and it came back a few days later in perfect working order. The original Renault key blade has been transplanted in to the new body.
View attachment 141981
I picked up some Poorboys wheel sealer in the week and will have a go at cleaning and sealing the Speedlines tomorrow. I will also try it on my Megane wheels as they always look filthy even though they are black wheels.
Attachments
Similar Thread Suggestions
| Thread starter | Similar threads | Forum | Replies | Date |
|---|---|---|---|---|
|
|
Clio 200 glacier white | Gallery | 0 | |
| S | 2010 Clio 200 with Cup pack, Glacier White, 27K miles, £8,250 | Clios For Sale | 3 | |
| C | For Sale: 2008 Glacier White Cup with Recaros | Clios For Sale | 7 | |
| L | Sold: 2008 clio 197 glacier white | Clios For Sale | 10 | |
|
|
??12 TBY Glacier White 200 Cup in Aberystwyth | Spotted | 0 |