Steves Megane conversion build - She's finally running (VIDEO inside)

Ill be concentrating on the cylinder head first, now its all been stripped. Today I cleaned up the valves and started the long process of polishing the combustion chambers to a mirror finish to prevent premature ignition. Ill also be stage 1 porting the head by removing all the cast marks and inlet matching. Here are some pics:
photo112_zps0e2736d3.jpgphoto213_zpsce327266.jpg
 
UPDATE: Picked myself up some polishing pads and flapper wheels for my air dremel. I set about polishing the combustion chambers to prevent carbon build up and "knock". If first used 100 grit wet and dry to flatten out all the casting marks from sand casting. This took around an hour for just one combustion chamber. I then moved to a 180 grit flapper wheel and smoothed out all the scratch marks from the previous stage. next was a 240 grit and 300 grit scotch bright wheel. Then finally used a cotton polishing pad with in combination with black then white rouge polish. This gave it a mirror like appearance which should really prevent carbon build up.

photo215_zpsa7658573.jpgphoto113_zps62022fe2.jpg
 
Yeah that's it mate, should be really nice once it's all done. Long way to go by the looks of it, takes so long going through the grades lol....
 
Right guys the polishing of the chambers is complete! Took over 10 hours in total but I'm very please with the results, the smoothness has increased drastically compared with the old surface that was pitted from sand casting. Next job is to polish and smooth out the inlet and exhaust ports and bowls. The casts marks are quite bad also

. image.jpg
 
they are a bit carp...especially when you see how better the Honda k20 head ports are :innocent:
 
UPDATE:

Out came the dremel again and it was time to tackle the exhaust ports. They were terrible to start with, pitted, flash marks down the sides, big ridges where the valve seats met the casting. I intended to smooth all of this and blend the bowels. I didn't make the ports bigger as this would have reduced the exiting gas velocity which in theory will give more turbo lag.

To prevent me hitting the valve seats with the dremel I covered them in blue tac, this worked incredibly well and the seats came out unscaved.

Many people grind the valve guides flush with the bowel, however I didn't do this in this case due to the exhaust gas temps which could potentially melt the valve stems. I will grind them flush on the inlet ports due to the low temps.

photo114_zpse2c2cb8e.jpg

photo216_zps172393e1.jpg


photo54_zps9c9b9d7d.jpg

photo49_zpsdd6b8287.jpgphoto312_zps1c8fff4e.jpg
 
Last edited:
Done quite a few things over the last week or so.

First off was a 36K service of the car, this included new plugs, oil, cabin filter, oil filter and brake fluid. Wow what a difference the plugs make, the car feels alive again and pulls so much harder.

While the car was up on the jacks i thought it was about time to replace my rear brake callipers, I had some refurbed ones spare and so now i finally have red calipers front and rear. Next month Ill replace the rear and front discs and fit braided lines.

photo21_zpsce2504ca.jpg

photo313_zpse01054e9.jpg

They look much better, just never got time to doing my own as Im always busy refurbing everyone elses callipers :lol:

With the car done it was now time to carry on with its new engine :smile: This time it was time to port the inlet ports. These were far easier the work with than the exhaust ports at the were a lot wider and shallower. I will also get most gains from re shaping and smoothing the inlet ports.


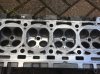
Below is an image of the ports before porting. As you can the see the partition it fairly large and will cause quite a bit of drag on the flowing air. Like the exhaust ports the walls of the port are really rough with cast marks running down the edges. The valve guides are protruding out which is also an area which will cause excess drag on the air flowing round them. My porting attempts will resolve these issues with the stock ports.


photo115_zpsa5def039.jpg

After the first pass with the 60 grit wheel the majority of the shaping is done, the partition has been knife edged to reduce the coefficient of drag on the incoming air. The ridge or hump at the start of the port has also been flattened and blended into the surroundings. The machined channels have also been blended into a smooth curve to aid air flow. The 60 grit wheel has also done a good job at removing all cast marks.

photo411_zps9fdc0b4d.jpg


The next stages was a pass with a 120 grit wheel to further refine the contours and smooth the surface. I then used a scotch bright wheel of 180 grit and then 280 grit to smooth the surface to exceptional finish.

I have left the short radius rough (Cant see this in this view) to cause a tumbling effect on the air to increase velocity around the bend into the valve opening. This turbulence should also help with fuel atomization creating a more efficient burn.

The valve guides have been ground flush with the bowls to also aid air flow. This can be done on the inlet due to the reduced temperatures compared with the exhaust ports where the guides are left untouched to protect the valve stem from the intense heat.

photo217_zps1fb2cdcd.jpg


I hope you guys are enjoying this build thread!!

Next time Ill blend the valve bowls and get the head skimmed then its time to install the new shiny valves :smiley:
 
Loving this!

So when will you be adding head porting/polishing to your list of services.... :-p
 
Last edited:
Loving this!

So when will you be adding head porting/polishing to your list of services.... :-p

Oh god no, this took me 36 hours and broke my dremel twice so i would have to charge A LOT to make it worth while :lol Ill just leave that to the professionals
 
Another week and some more work done to the engine.

First off was tackling the inlet bowls. I had to get these all exactly the same to keep airflow through all the ports uniformed. I therefore like before put blue tac around each valve seat to protect them should i slip. I then went in again with the 60 grit wheel then 120. I tried to time myself on each port to prevent me over grinding one of the bowls. After this stage I used a 240 grit flapper wheel to further smooth the contours of the bowl.

Before finsishing with the buffing wheels I inspected the bowls with a vernier calliper, they were all within 0.25mm of each other which I don't think is to bad for just a dremel.

Finally using the finishing buffs I finished the bowls in 400 grit as I want low air resistance just before entering the chamber.

C8A4BBFA-6861-495C-83D5-24FD8D356FBC_zpsrwccj1h2.jpg


99CC3B7E-C343-4DFC-A8D9-617A25507508_zpsqzcndejc.jpg


Now with the porting and polishing complete (THANK GOD!!!) its time to get the head cleaned up and skimmed ready for painting. To achieve this i will sand blast the exterior of the head. This means I have to mask off all the machined surfaces and bolts holes. For the combustion chambers I made a aluminum plate to block off this area. Using the head gasket as a template I marked out the bolts holes and drilled them out. Then using 120mm long M10 bolts and nuts I bolted the plate on to the head using the existing head bolt holes (I hope this makes sense :lol: )

AE38B2BD-EDAC-4E37-B838-6A84D6DE86F7_zps9l93d5uq.jpg

Over the weekend Ill mask off the other areas using a mix of electrical tape and duct tape. Then I can get it blasted on monday.


I now have to decide the colour scheme of the engine. I was thinking of a gun metal grey for the head and rocker cover with a black intake port and block.

Any ideas will be greatly welcome.

Cheers