You are using an out of date browser. It may not display this or other websites correctly.
You should upgrade or use an alternative browser.
You should upgrade or use an alternative browser.
R20 BTG - 200 Cup Track Car Blog
- Thread starter R20BTG
- Start date
R20BTG
Paid Member
DJI is already miles better than the GoPro. Just some thoughts off the top of my head.
- GoPro always used to forget the white balance settings when it was powered off. DJI remembers the settings so you only have to set it once.
- DJI phone app is much better than the GoPro, instantly connects wirelessly whenever the camera is powered on, whereas the GoPro you had to change the WiFi settings on the phone each time.
- GoPro used to stop recording randomly, you were never sure once you'd hit record whether it would stay recording. I've lost so many track days due to it deciding not to record. DJI just worked and stayed recording every time.
- GoPro used to complain about a corrupt SD card despite it being reformatted in the GoPro several times. The same SD card formatted in the DJI has been totally fine.
- The 'beep' is much louder from the DJI so when I turn around and press record I can hear the confirmation in my helmet, whereas I was never quite sure if the GoPro was on.
- The footage seems much higher quality from the DJI compared to the GoPro, the colours are deeper, the black areas are blacker, and the previously mentioned white balance is so much better.
- The DJI uses the same attachment as the GoPro, so it was plug and play.
burrellbloke
Paid Member
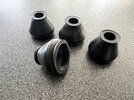
Did you ever get a response from Superpro about the boots? Our boots are looking like they are about to split. I have e-mailed Superpro about the problem suggesting that they should not perish within a few months and will see what they say.I noticed when I was doing the brake cooling that the dust boots on the SuperPro anti-rotation links were cracking and perishing. I'm replacing these before they split and lose the grease inside. I called up SuperPro (Octane Distribution Ltd) to enquire about spares.
View attachment 157081
They are £6+VAT each (!!!!!), plus a £5 delivery charge, which quite frankly is a piss take for a small rubber dust boot. So here are the dimensions if anyone else has the same problem and wants to source some universal ones that might do the same job:
11mm internal diameter top hole:
View attachment 157075
25mm diameter bottom hole:
View attachment 157076
30mm diameter at the widest point:
View attachment 157078
25mm height:
View attachment 157079
18mm top hat diameter:
View attachment 157080
If anyone finds some, do me a favour and buy a handful for me as well, as this seems to be a known problem and the original ones are shite, this is probably an annual service item now
deekay16v
Gold Member
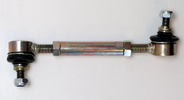
Seeing how more of you have problems with superpro droplinks, I have gone with the H&R ones. They are not that fancy looking, main rod is just galvanized steel, not anodized aliminium, but you have three different rod lengths to choose from alreadyin the package and its cheaper than superpro also. Lets see how it holds up.

LiamP
Paid Member
Interested to know what they say as all of mine are the same but tbh I think I am just going to replace the ends with sphericals next time I get an alignmentDid you ever get a response from Superpro about the boots? Our boots are looking like they are about to split. I have e-mailed Superpro about the problem suggesting that they should not perish within a few months and will see what they say.
R20BTG
Paid Member
The only response I got was that they were quite happy to sell me more
burrellbloke
Paid Member
I have sent off a warranty claim form to Superpro with an invoice showing I paid for the anti rotation links and a photo of the damaged boots. They have replied today to say they will send out some replacement boots to me.Did you ever get a response from Superpro about the boots? Our boots are looking like they are about to split. I have e-mailed Superpro about the problem suggesting that they should not perish within a few months and will see what they say.
I can't upload the warranty form here as it is an Excel form but if anyone wants it send me a PM with your e-mail address and I will send it to you.
Jack Maxwell
Paid Member
Not checked mine since my trip to the Nring. I may need itI have sent off a warranty claim form to Superpro with an invoice showing I paid for the anti rotation links and a photo of the damaged boots. They have replied today to say they will send out some replacement boots to me.
I can't upload the warranty form here as it is an Excel form but if anyone wants it send me a PM with your e-mail address and I will send it to you.
burrellbloke
Paid Member
R20BTG
Paid Member
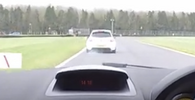
I think I've made some progress on the brake locking issue. For those unaware, on heavy braking the left rear wheel is locking, which either results in a best case scenario of a black line and a cloud of white smoke:
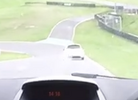
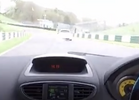
Or a worst case scenario of the back end coming round under braking:
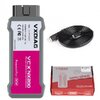
First up was to get the car plugged into a proper diagnostic machine, so I've invested in a VXDIAG VCX NANO diagnostic tool that works with Clip v2.19. LINK here.
I originally tried running Clip on a Virtual Windows 11 machine inside Parallels on a MacBook Pro (see thread HERE) but that doesn't seem to play nice and didn't recognise the OBD2 device.
I've bought an old refurbished Dell 12.5" laptop and I'm pleased to say I got it all installed and running last night, and I could connect to the car and begin a bit of a deep dive into what might be wrong. I've never used Clip before so that was also a bit of a learning curve.
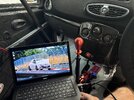
What I did find from rooting around in Clip is the following, a fault logged on the 1094 CAN network which relates to the ABS:
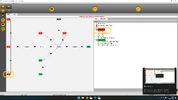
I couldn't quite work out how to get to the actual stored error code, I could only get as far as there being one error code stored:
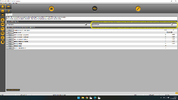
After poking around a bit in the software, I found the menu where I could perform some test routines. I started with AC016 which tested the ABS pump. That all sounded pretty normal with the sound(s) coming from the engine bay. I then went through each of the solenoid test routines starting with left front (AC003), right front (AC004), right rear (AC006). You have to have a foot on the brake pedal to peform these test routintes.
All of these felt and sounded the same, the ABS pump would activate, the solenoid would open, you could feel the pressure in the brake pedal, you could hear the pump working and you could feel the vibration in the brake pedal. That was until I got to test AC005 (left rear).
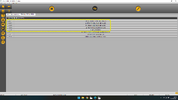
Running test AC005 (left rear) sounded completely different, is sounded strained, it sounded like it was struggling, there was a noticeable difference to the sound of the other three, and the pedal felt different (no ABS pressure). I did the same tests again, AC003, AC004, AC006 all consistent, AC005 the odd ball.
So I think what we have here is a faulty left rear solenoid inside the ABS module. I'm actually quite relieved the diagnostics showed something not right, it validates that it's not suspension related, geometry related, or something to do with my driving style.
I've got a brand new OEM ABS module to fit (part number 8201154658). It wasn't as expensive as I thought. There were second hand ones on ebay for £30-£60 of unknown origin, or a brand new one for £117 delivered. I took the plunge and bought new.
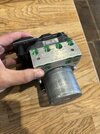
Just need to find the time and motivation to get it swapped out and bled, plus a few other bits and bobs I've been acquiring.


Or a worst case scenario of the back end coming round under braking:
First up was to get the car plugged into a proper diagnostic machine, so I've invested in a VXDIAG VCX NANO diagnostic tool that works with Clip v2.19. LINK here.

I originally tried running Clip on a Virtual Windows 11 machine inside Parallels on a MacBook Pro (see thread HERE) but that doesn't seem to play nice and didn't recognise the OBD2 device.
I've bought an old refurbished Dell 12.5" laptop and I'm pleased to say I got it all installed and running last night, and I could connect to the car and begin a bit of a deep dive into what might be wrong. I've never used Clip before so that was also a bit of a learning curve.

What I did find from rooting around in Clip is the following, a fault logged on the 1094 CAN network which relates to the ABS:

I couldn't quite work out how to get to the actual stored error code, I could only get as far as there being one error code stored:

After poking around a bit in the software, I found the menu where I could perform some test routines. I started with AC016 which tested the ABS pump. That all sounded pretty normal with the sound(s) coming from the engine bay. I then went through each of the solenoid test routines starting with left front (AC003), right front (AC004), right rear (AC006). You have to have a foot on the brake pedal to peform these test routintes.
All of these felt and sounded the same, the ABS pump would activate, the solenoid would open, you could feel the pressure in the brake pedal, you could hear the pump working and you could feel the vibration in the brake pedal. That was until I got to test AC005 (left rear).

Running test AC005 (left rear) sounded completely different, is sounded strained, it sounded like it was struggling, there was a noticeable difference to the sound of the other three, and the pedal felt different (no ABS pressure). I did the same tests again, AC003, AC004, AC006 all consistent, AC005 the odd ball.
So I think what we have here is a faulty left rear solenoid inside the ABS module. I'm actually quite relieved the diagnostics showed something not right, it validates that it's not suspension related, geometry related, or something to do with my driving style.
I've got a brand new OEM ABS module to fit (part number 8201154658). It wasn't as expensive as I thought. There were second hand ones on ebay for £30-£60 of unknown origin, or a brand new one for £117 delivered. I took the plunge and bought new.

Just need to find the time and motivation to get it swapped out and bled, plus a few other bits and bobs I've been acquiring.
burrellbloke
Paid Member
Well done for identifying the problem.
Does your VXDIAG device maintain a constant connection? My cheap CLIP clone drops the connection to the car randomly which makes it useless for some tasks.
Does your VXDIAG device maintain a constant connection? My cheap CLIP clone drops the connection to the car randomly which makes it useless for some tasks.
R20BTG
Paid Member
burrellbloke
Paid Member
If you have had it connected for more than 10 minutes without it disconnecting then it works better than mine.
R20BTG
Paid Member
Spent a couple of hours relocating the coolant reservoir this morning in advance of battery relocation and new airbox.
There’s a couple of ways of doing this, you can keep the Clio reservoir and move it to the top right of the engine bay:
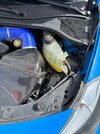
Or you can ditch the Clio header tank and replace it with something else, in this case the Dacia Duster header tank.
I went for the Dacia option. Measured up and decided an offset bracket and spacer setup would get it in the position I wanted:
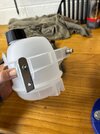
Fabricated the bracket from some stainless I had lying around:
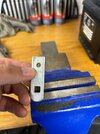
Installed some M6 rivnuts:
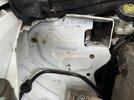
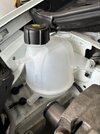
I’d ordered some 16mm and 10mm red silicone coolant hoses to match the other set, trimmed them to the right length and topped the coolant back up again.
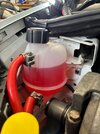
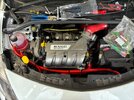
There’s a couple of ways of doing this, you can keep the Clio reservoir and move it to the top right of the engine bay:

Or you can ditch the Clio header tank and replace it with something else, in this case the Dacia Duster header tank.
I went for the Dacia option. Measured up and decided an offset bracket and spacer setup would get it in the position I wanted:

Fabricated the bracket from some stainless I had lying around:

Installed some M6 rivnuts:


I’d ordered some 16mm and 10mm red silicone coolant hoses to match the other set, trimmed them to the right length and topped the coolant back up again.


R20BTG
Paid Member
Brake Cooling
My FortyOneDegrees 3D printed cooling ducts turned up and had a morning on the car sorting out the brake cooling setup once and for all.
View attachment 157035
To get a duct from the fog light vent to the caliper, I needed to get the existing screenwash reservoir out of the way as it sits right behind the fog light. My previous ducts were squashed behnid it and zip tied to the suspension knuckle and it's just been torn apart.
A lot of credit to @EthanMenace who's photos and messages have been invaluable. I bought a smaller washer reservoir with integrated pump from Amazon https://www.amazon.co.uk/gp/product/B077N3V7H1/?tag=clio197-21
Drained and removed the existing washer reservoir, marked the mounting location on the chassis leg:
View attachment 157018
Double check mounting bracket fitment:
View attachment 157019
Drill holes and add rivnuts to chassis leg:
View attachment 157020
Add mounting bracket with some washers, decided to use allen bolts as getting a socket on the head was actually tricky:
View attachment 157022
Test fit, managing to retain the OEM filler neck which I wanted to do:
View attachment 157023
To seal the filler neck to the top of the new reservoir I cut up an old mountain bike inner tube, and zipped tied tight top and bottom after a few wraps:
View attachment 157024
Then a couple of layers of duct tape just for good measure:
View attachment 157025
Cut off the old pump plug, solder on the new pump plug, heat shrink:
View attachment 157026
Wrapped in loom tape to tidy it up, connect up the washer hose and test fill. No leaks:
View attachment 157027
You can see how much room has been created beneath the reservoir, now the work begins to sort the brake ducting:
View attachment 157028
The FortyOneDegrees ducts fit absolutely perfectly, they're not cheap but with this level of R&D and quality, you can't really complain. These are the 63mm duct versions I had made to match the 63mm ducting I already had, and the 63mm Wheeler Motorsport stainless steel fog light ducts.
Full lock left:
View attachment 157029
Full lock right:
View attachment 157030
Then installed on the passenger side (no space issues to worry about here:
View attachment 157031
Bumper back on and connected to the fog light ducts:
View attachment 157032
View attachment 157033
Had a bit of hose left over so extended the OEM airbox cold air feed down into the wheel arch:
View attachment 157034
Productive day
I have some of these 41 degree ducts that i'd like to fit - do you have to remove the arch liners?
R20BTG
Paid Member
Replaced the dead starter motor yesterday. What a horrible job. The heat wrapped exhaust and heat wrapped starter didn't protect the brazing that I've talked about on previous posts, and it's failed yet again in Germany. Got the front of the car up in the air (what I'd give for a two post ramp!).
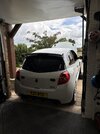
Being under the car for an extended period I wanted something more secure than axle stands, so out came the OZ:
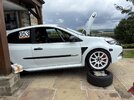
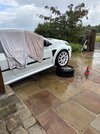
Just in time for it to chuck it down with rain. FFS.
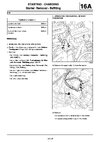
Chapter 16A of the service manual is your friend, and makes it look easy:
In reality:

Being under the car for an extended period I wanted something more secure than axle stands, so out came the OZ:

Just in time for it to chuck it down with rain. FFS.

Chapter 16A of the service manual is your friend, and makes it look easy:

In reality:
- Get the car jacked up in the sun. Disconnect the battery.
- Crawl under the car, get rained on. Realise you can't close the window that you've left open as you've disconnected the battery and you can't be bothered trying to reconnect it in the pissing rain. Close the bonnet and drape old towels over the open window instead.
- Have a 45 minute break until the rain stops and the floor dries out.
- Struggle to get your arms in the space under the car to even see how to disconnect the lower starter bolt.
- Undo the lower starter bolt with a combination of whatever 13mm socket you can fit in there. Feel free to use every combination of ratchet, short socket, long socket, spanner, offset spanner and electric ratchet depending on how big your arms and hands are. For added value, whack your fist and knuckles on anything hard and sharp, and make sure to drop your tools on your own head at regular intervals.
- Make sure that when you're lying on your back, none of the other tools are in reach, so you have to get up and look for it every time you change.
- Struggle to even see where the top two connector bolts are from underneath the car.
- Realise that following the service handbook might have been a good idea, in that the top two bolts are only visible from above.
- Decide to remove the battery, battery tray, airbox and expose the top bolts like you should have done from the beginning.
- Remove the two 13mm bolts with whatever you can squeeze in there.
- Get back under the car and try and remove the 10mm bolt from the power wiring terminal and 8mm bolt from the exciter wiring terminal, but then realise because you've undone all the 13mm bolts and the starter is loose, you don't have enough purchase on it, and it just keeps moving.
- Reluctantly decide to bolt the starter back to the engine again, and curse yourself for not following the service manual order. It's in that order for a reason.
- Struggle to get the starter bolted back up as the top bolts won't line up. Swear a bit.
- Finally get the starter bolted back up and try not to remember that 1h 45m into the job, you're back to square one.
- Crawl back under the car and try and undo the 10mm power wiring terminal using a combination of ratchet extensions to somehow get your hand to be able to turn in such a tight space. Lose your temper because the bolt just appears to keep spinning and it won't come off.
- Text your mate who is a much better mechanic than you are to see WTF is going wrong. Get some advice that says the bolt stays connected to the electrical connector and once it keeps spinning you need to pull it away at the same time. Try and do this with the third hand that you don't have spare, because one hand is holding a torch and the other hand the ratchet. Struggle to pull it away because Renault decided to use as little wiring as possible so there's no slack. Eventually get it off.
- With the starter motor loose, try and work out how the hell to get it out whilst underneath the car. Twist it and turn it in all directions and realise there's no way it's going to come out from below. Put it back, and try and get it out from above instead.
- Wiggle it free and rejoice that there's an obvious fault that's causing the issue, and it isn't something else you're going to have to diagnose.
Similar Thread Suggestions
| Thread starter | Similar threads | Forum | Replies | Date |
|---|---|---|---|---|
|
|
200T: R200 CHJ | Spotted | 0 | |
|
|
200: White 200 with R200 plate New Lubbersthorpe, Leicester | Spotted | 0 | |
|
|
Car reg for sale R200 TBM | Car Parts For Sale | 2 | |
|
|
Old timer making a return.... UR200! | New Members | 43 | |
|
|
197: Red, Iveson Drive Leeds 16 R200 T*T | Spotted | 0 |


