

You are using an out of date browser. It may not display this or other websites correctly.
You should upgrade or use an alternative browser.
You should upgrade or use an alternative browser.
R20 BTG - 200 Cup Track Car Blog
- Thread starter R20BTG
- Start date
I’ll not hold it against youIt did, whenever it's the Calcutta Cup I support Scotland (I'm half Scottish and played Scotland U19/U21 when I was younger)

Alistair
Gold Member
Glad you got a set .. im super happy with them!I've never been happy with the way my brake cooling ducts were fitted, pointing(ish) at the caliper and disc but zip tied to the swivel. It was questionable where the air was being directed and eventually the back and forth of the swivel knuckle just ripped the tubing.
An option was to go for the Corvette ducts that a few people on here use, but I spotted these on Instagram and thought they were a very clever solution.
 Create an account or log in to Instagram - Share what you're into with the people who get you.
www.instagram.com
It is a 3D printed flexible composite which alledgedly copes with temperatures of up to 110c on the surface. They zip tie to the pivot holder but crucially do not move with the swivel hub, meaning the whole brake cooling setup is fixed in position and designed around the arc of the swivel hub.
I've ordered the 63mm hose version to go along with some new 63mm flexible hose, which will be joined to the Josh Wheeler foglight ducts currently installed. I have a shorter height screenwash reservoir to fit at the same time to make room for the brake duct on the driver side. These should be here in a couple of weeks so I'll report back on progress.
R20BTG
Paid Member
Brake Cooling
My FortyOneDegrees 3D printed cooling ducts turned up and had a morning on the car sorting out the brake cooling setup once and for all.

To get a duct from the fog light vent to the caliper, I needed to get the existing screenwash reservoir out of the way as it sits right behind the fog light. My previous ducts were squashed behnid it and zip tied to the suspension knuckle and it's just been torn apart.
A lot of credit to @EthanMenace who's photos and messages have been invaluable. I bought a smaller washer reservoir with integrated pump from Amazon https://www.amazon.co.uk/gp/product/B077N3V7H1/?tag=clio197-21
Drained and removed the existing washer reservoir, marked the mounting location on the chassis leg:

Double check mounting bracket fitment:

Drill holes and add rivnuts to chassis leg:

Add mounting bracket with some washers, decided to use allen bolts as getting a socket on the head was actually tricky:

Test fit, managing to retain the OEM filler neck which I wanted to do:

To seal the filler neck to the top of the new reservoir I cut up an old mountain bike inner tube, and zipped tied tight top and bottom after a few wraps:

Then a couple of layers of duct tape just for good measure:

Cut off the old pump plug, solder on the new pump plug, heat shrink:

Wrapped in loom tape to tidy it up, connect up the washer hose and test fill. No leaks:

You can see how much room has been created beneath the reservoir, now the work begins to sort the brake ducting:

The FortyOneDegrees ducts fit absolutely perfectly, they're not cheap but with this level of R&D and quality, you can't really complain. These are the 63mm duct versions I had made to match the 63mm ducting I already had, and the 63mm Wheeler Motorsport stainless steel fog light ducts.
Full lock left:

Full lock right:

Then installed on the passenger side (no space issues to worry about here:

Bumper back on and connected to the fog light ducts:


Had a bit of hose left over so extended the OEM airbox cold air feed down into the wheel arch:

Productive day
My FortyOneDegrees 3D printed cooling ducts turned up and had a morning on the car sorting out the brake cooling setup once and for all.
To get a duct from the fog light vent to the caliper, I needed to get the existing screenwash reservoir out of the way as it sits right behind the fog light. My previous ducts were squashed behnid it and zip tied to the suspension knuckle and it's just been torn apart.
A lot of credit to @EthanMenace who's photos and messages have been invaluable. I bought a smaller washer reservoir with integrated pump from Amazon https://www.amazon.co.uk/gp/product/B077N3V7H1/?tag=clio197-21
Drained and removed the existing washer reservoir, marked the mounting location on the chassis leg:
Double check mounting bracket fitment:
Drill holes and add rivnuts to chassis leg:
Add mounting bracket with some washers, decided to use allen bolts as getting a socket on the head was actually tricky:
Test fit, managing to retain the OEM filler neck which I wanted to do:
To seal the filler neck to the top of the new reservoir I cut up an old mountain bike inner tube, and zipped tied tight top and bottom after a few wraps:
Then a couple of layers of duct tape just for good measure:
Cut off the old pump plug, solder on the new pump plug, heat shrink:
Wrapped in loom tape to tidy it up, connect up the washer hose and test fill. No leaks:
You can see how much room has been created beneath the reservoir, now the work begins to sort the brake ducting:
The FortyOneDegrees ducts fit absolutely perfectly, they're not cheap but with this level of R&D and quality, you can't really complain. These are the 63mm duct versions I had made to match the 63mm ducting I already had, and the 63mm Wheeler Motorsport stainless steel fog light ducts.
Full lock left:
Full lock right:
Then installed on the passenger side (no space issues to worry about here:
Bumper back on and connected to the fog light ducts:
Had a bit of hose left over so extended the OEM airbox cold air feed down into the wheel arch:
Productive day
Attachments
burrellbloke
Paid Member
R20BTG
Paid Member
I noticed when I was doing the brake cooling that the dust boots on the SuperPro anti-rotation links were cracking and perishing. I'm replacing these before they split and lose the grease inside. I called up SuperPro (Octane Distribution Ltd) to enquire about spares.

They are £6+VAT each (!!!!!), plus a £5 delivery charge, which quite frankly is a piss take for a small rubber dust boot. So here are the dimensions if anyone else has the same problem and wants to source some universal ones that might do the same job:
11mm internal diameter top hole:

25mm diameter bottom hole:

30mm diameter at the widest point:

25mm height:

18mm top hat diameter:

If anyone finds some, do me a favour and buy a handful for me as well, as this seems to be a known problem and the original ones are shite, this is probably an annual service item now
They are £6+VAT each (!!!!!), plus a £5 delivery charge, which quite frankly is a piss take for a small rubber dust boot. So here are the dimensions if anyone else has the same problem and wants to source some universal ones that might do the same job:
11mm internal diameter top hole:
25mm diameter bottom hole:
30mm diameter at the widest point:
25mm height:
18mm top hat diameter:
If anyone finds some, do me a favour and buy a handful for me as well, as this seems to be a known problem and the original ones are shite, this is probably an annual service item now
RSRowe
Paid Member
S24nrc
Paid Member

EthanMenace
Paid Member
There are flexible materials you can print with like TPU, no idea how it’d hold up on something like that constantly flexing and covered in grease though. Not particularly well I imaginePrint out of what? They need to be flexible, is that even possible?
@RSRowe is the professional though
Last edited:
R20BTG
Paid Member
Cadwell Park 8th April 2024
First proper track day of the year after the failed attempt at Donington in March. Between then I'd replaced all four spark plugs and the car was running nicely. Trailered it over the night before and stayed in Kenwick Park which was about 10 minutes from the circuit.

 www.kenwick-park.co.uk
Definitely worth doing, the room was £90 and it was great to get there, relax, have dinner and a couple of beers and not have to worry about a stupid early start. Even after a leisurely breakfast we were still there with plenty of time.
First track day with @s88thy in his newly acquired supercharged Clio, was half expecting some problems somewhere throughout the day but pleased to see he drove it there, lapped it, and drove it home again. My car is dialled in just where I want it now, so it's just a case of warming up the tyres and giving it some stick. The first session was spent showing Matt the lines around Cadwell Park:


Then had a session with @Beany and my brother in law strapped in as ballast. Believe it or not this is the first time the 'sister' Supreme Motorsport cars have been out on track together.
Got caught and overtaken by a TrackBaguette. Seems to happen every time.

Did a bit of three wheeling:

Took Matt out to show him that he shouldn't have bought a supercharged car an instead just gone full retard track spec:

Had a session with @burrellbloke and @EthanMenace and it turned into a ding dong with an E36 M3.

Other than rotating the tyres front to rear at lunchtime to even out the wear, nothing needed doing. Had a cracking day.
I'm now officially done with GoPro cameras, I didn't catch any footage whatsoever as my camera was playing up all day. I'd press record and it woud just freeze, the software would crash, and I could only get it back on again with a battery pull. I'll be replacing them with another camera brand.
Need to sort the rough running issue out and give it a service before Germany at the end of the month.
First proper track day of the year after the failed attempt at Donington in March. Between then I'd replaced all four spark plugs and the car was running nicely. Trailered it over the night before and stayed in Kenwick Park which was about 10 minutes from the circuit.
Kenwick Park Hotel in Louth | Kenwick Park Estate
Discover the beauty of Kenwick Park in Louth. Explore our amenities and book your stay today for an unforgettable experience.
www.kenwick-park.co.uk
Definitely worth doing, the room was £90 and it was great to get there, relax, have dinner and a couple of beers and not have to worry about a stupid early start. Even after a leisurely breakfast we were still there with plenty of time.
First track day with @s88thy in his newly acquired supercharged Clio, was half expecting some problems somewhere throughout the day but pleased to see he drove it there, lapped it, and drove it home again. My car is dialled in just where I want it now, so it's just a case of warming up the tyres and giving it some stick. The first session was spent showing Matt the lines around Cadwell Park:
Then had a session with @Beany and my brother in law strapped in as ballast. Believe it or not this is the first time the 'sister' Supreme Motorsport cars have been out on track together.
Got caught and overtaken by a TrackBaguette. Seems to happen every time.
Did a bit of three wheeling:
Took Matt out to show him that he shouldn't have bought a supercharged car an instead just gone full retard track spec:
Had a session with @burrellbloke and @EthanMenace and it turned into a ding dong with an E36 M3.
Other than rotating the tyres front to rear at lunchtime to even out the wear, nothing needed doing. Had a cracking day.
I'm now officially done with GoPro cameras, I didn't catch any footage whatsoever as my camera was playing up all day. I'd press record and it woud just freeze, the software would crash, and I could only get it back on again with a battery pull. I'll be replacing them with another camera brand.
Need to sort the rough running issue out and give it a service before Germany at the end of the month.
tombate911
Paid Member
Car looks spot on in those photos! Big fan of the white wheels.
Good to have a chat with you on Monday all be it a short one while faffing.
Which go pro were you using out of interest? I've been trying to get one working in the car for some alternative footage but still not quite there with it. At least it stayed on all day this time and didn't go off but left the stabilisation on so it keeps looking out the side windows. Oops!
R20BTG
Paid Member
Short version - New coil pack needed.
Long version - car was running fine at Cadwell Park, left it on the trailer overnight then took it for a pre-Germany service. On starting it up, it was running rough again. Plugged in and it gave the following:

P0530 I though we can probably ignore as I’ve removed the AC system.
P0138 could be because of the decat and remap.
P0425 and P0426 I thought might point to a faulty or damaged pre-cat lambda so I ordered a new one.
P0440 I thought we can probably ignore as I’ve removed the emissions canister thing.
The new lambda sensor did nothing, so I’ve now got a spare. There’s a theme here to my fault finding…
I’d originally ruled out injectors having replaced them and also coil packs having swapped them over and not fixing the issue (more on this later). That left me scratching my head thinking it could only be a loom or connection problem.
I’ve been down to the car today and taken off the whole injector/coil loom. I’ve unpicked all the wrap, cleaned all the connectors, done a full visual inspection, and tested the continuity of every single wire using a multimeter. No issues. Thinking the worse, I’d bought a second hand one on eBay for £30 which arrived today. I’ve now got a spare (stop laughing at the back).

I re-wrapped it all back neatly in loom tape and it now looks neater than it did before.
While everything was apart, decided to reattach the plugs to the coils and ground them on the engine block and just crank the car and see if it was a spark or fuel problem. Strong sparks on Cylinders 1, 3 and 4. No spark on Cylinder 2. Now that gives us something to go on. It’s not the spark plug as they are new, it’s not the loom as I’ve just tested it all. It MUST be the coil pack, but I’ve ruled that out already, or have I?
Stupidly I think I remember swapping coil pack 4 and 3 and the issue remaining. I never went as far as 2, because it seemed to make no difference. Swapping coil 4 and 2 resulted in no spark at 4. Aha, light bulb moment. Put in a spare coil and voila, sparks on all four! Could that be it?
I buttoned everything back together, and boom, rough running gone. I feel like an idiot for not doing a proper diagnostic routine.
With the engine now appearing to run fine I decided carry on with the rest of the service, kindly being allowed to use the ramps. It makes such a difference having the car in the air!

Engine oil and filter changed, gearbox oil changed.
Long version - car was running fine at Cadwell Park, left it on the trailer overnight then took it for a pre-Germany service. On starting it up, it was running rough again. Plugged in and it gave the following:
P0530 I though we can probably ignore as I’ve removed the AC system.
P0138 could be because of the decat and remap.
P0425 and P0426 I thought might point to a faulty or damaged pre-cat lambda so I ordered a new one.
P0440 I thought we can probably ignore as I’ve removed the emissions canister thing.
The new lambda sensor did nothing, so I’ve now got a spare. There’s a theme here to my fault finding…
I’d originally ruled out injectors having replaced them and also coil packs having swapped them over and not fixing the issue (more on this later). That left me scratching my head thinking it could only be a loom or connection problem.
I’ve been down to the car today and taken off the whole injector/coil loom. I’ve unpicked all the wrap, cleaned all the connectors, done a full visual inspection, and tested the continuity of every single wire using a multimeter. No issues. Thinking the worse, I’d bought a second hand one on eBay for £30 which arrived today. I’ve now got a spare (stop laughing at the back).
I re-wrapped it all back neatly in loom tape and it now looks neater than it did before.
While everything was apart, decided to reattach the plugs to the coils and ground them on the engine block and just crank the car and see if it was a spark or fuel problem. Strong sparks on Cylinders 1, 3 and 4. No spark on Cylinder 2. Now that gives us something to go on. It’s not the spark plug as they are new, it’s not the loom as I’ve just tested it all. It MUST be the coil pack, but I’ve ruled that out already, or have I?
Stupidly I think I remember swapping coil pack 4 and 3 and the issue remaining. I never went as far as 2, because it seemed to make no difference. Swapping coil 4 and 2 resulted in no spark at 4. Aha, light bulb moment. Put in a spare coil and voila, sparks on all four! Could that be it?
I buttoned everything back together, and boom, rough running gone. I feel like an idiot for not doing a proper diagnostic routine.
With the engine now appearing to run fine I decided carry on with the rest of the service, kindly being allowed to use the ramps. It makes such a difference having the car in the air!
Engine oil and filter changed, gearbox oil changed.
R20BTG
Paid Member
Also removed the dead Godspeed discs and dead DS1.11 pads. Fitted new Brembo discs and new DS1.11 pads. Gave the pins and good clean and a bit of copper slip.


On a roll, I went to flush the brake fluid through, only to find that whatever ham fisted idiot was there before (wasn’t me, before you ask) has completely mullered the bleed nipple on the NSR, it basically fell apart as soon as I put a spanner on it. No idea how it hasn’t leaked until now.
I need a new caliper, so that put an end to today’s work. I’ve messaged Max S to see if he’s got any in stock.
burrellbloke
Paid Member
I found another video from Cadwell where Ethan was chasing you Iain.
R20BTG
Paid Member
I’ve taken both rear calipers off this morning, if I’m getting one done I might as well get both done. It’s only money right 

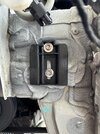
Here’s the offending bleed nipple that some utter cretin has just mangled:

Pad wear comparison between sides. I do wonder if the brake locking at Cadwell Park was due to a sticky NSR caliper:


Sums up my feelings at the moment having been rained on this morning:

Here’s the offending bleed nipple that some utter cretin has just mangled:
Pad wear comparison between sides. I do wonder if the brake locking at Cadwell Park was due to a sticky NSR caliper:
Sums up my feelings at the moment having been rained on this morning:
RSRowe
Paid Member
if I’m getting one done I might as well get both done.

Similar Thread Suggestions
| Thread starter | Similar threads | Forum | Replies | Date |
|---|---|---|---|---|
|
|
200T: R200 CHJ | Spotted | 0 | |
|
|
200: White 200 with R200 plate New Lubbersthorpe, Leicester | Spotted | 0 | |
|
|
Car reg for sale R200 TBM | Car Parts For Sale | 2 | |
|
|
Old timer making a return.... UR200! | New Members | 43 | |
|
|
197: Red, Iveson Drive Leeds 16 R200 T*T | Spotted | 0 |