GW 200 CUP (clubsport->racecar->v2)

The detectors can all be removed, the one thing I couldn’t remove without the light was the passenger airbag button, not sure if that is possible?
that needs to stay too. Can’t be coded out with CLIP
 
Pretty sure you’re describing the keyless entry sensors. The crash sensors are in the bottom of the B pillar.
Could well be ‍♂️ I thought they were maybe the crash sensors. I’m not bothered by the keyless entry as long as the key card works it’s fine
 
that needs to stay too. Can’t be coded out with CLIP
Thanks for the info. I’m going to have a look and see what can be coded out and if I don’t need or want it and it can be coded out chances are in time it’ll go.
First stage will be a slight tidy up of the rear loom and stereo and heater removal. I’ll likely remove the keyless entry sensors too as well as airbags but leave the controller as you say.
 
Baby has arrived so this post might be all over the place. The block is in my kitchen, loom is in 5 pieces in my study, the crank is in a machine shop, the head is in a different machine shop, various parts are getting blasted in Kent, the dampers are in Bristol, the hubs are in the shed in about a million pieces.. But the good news is that I have some potential sponsors / partners to work with this year which I am really excited about.

D4F5C3A1-7395-4BBE-AE5E-283DAEBDE0F3.jpeg

Briefly had half of the loom in the car to check that the lights still worked, the crash had ripped the front section off and I had spliced mine and the loom that the shell came with. Ignoring lots of warnings on the dash (no ECU) It all seemed to work which means I can retape and install. There is going to be a lot of work involved in sorting the wiring on the inside, lots of earths have been removed and I don’t / can’t use the standard dashboard without heavily modifying (could do without the weight as well).Contemplating something very ‘minimalistic’ and potentially a digi dash depending how this engine rebuild goes.

Few weeks ago I dropped the crank off at AMS in Ditchling to be polished and balanced, mentioned it was from a Clio, ‘Are you the guy with the white Clio who had the crash?’, seems I have become famous. This has now been polished with no issues on dimensions or condition and is now being balanced with the complete bottom end.

7F3A99A8-57B8-494F-B0F1-3588B6F14E4E.jpeg

DEBDB64A-6FB6-4232-B6DB-2D6732AB7BAB.jpeg

Relieved as in some daylight the main bearings look like they have had a hard time. Cleaned up the caps with brake cleaner and removed the sealant on #1 now all ready to be installed.

0BDAFFCA-092A-4BF3-BB59-9F4D1C5C7B53.jpeg

A2EC1204-B889-47AB-B3C2-12BD70F55D63.jpeg

Stripped the head down, Amazon special jewellery boxes have worked a treat in storing the various parts in order. Checked the valve guides and realised that they had a lot of movement / wear especially on exhaust side so back to AMS for replacement and seat cutting. Very kindly offered to rebuild a few parts / measure and given me a ton of advice on what to do / not to do. Engine building is a complete mine field, everyone does things differently and they are all correct.

C2365F8C-5952-491B-AB77-2738DF63A1D9.jpeg

920DD10D-8233-4941-A9D6-5C30F2726238.jpeg

Yesterday I finally had some time to start cleaning / checking the pistons, of course there is a chip in #1. It looks fresh so potentially this was crash damage and / or caused by the ingestion of the intake air temp sensor. The only good news I can take from this is that the rebuild was required, a chip like this risks hot spots / detonation..

0615AC91-A878-4BE9-AF5F-759E2ECB5883.jpeg

5E3D789A-D0BE-46F2-AE87-5003F1E05617.jpeg

Alex from AW has offered to send me a replacement, this coupled with sourcing the engine parts means a few stickers will certainly be on the car. The guy is a complete legend as I have done nothing to deserve all his help and advice. A made the effort to weigh them all and interestingly they are all within about 2g of each other which is impressive for OEM, might try and get this closer when I revuild

347C7035-AC35-4C12-9F4B-1FD9302F869A.jpeg

Found a local vapour blaster to clean up a few of the components which are now looking better than new!

5BB9E251-153F-46B1-9463-B8574407CF86.jpeg

I want to get the engine rebuild started and the shell rolling on 4 wheels by the end of the month, let’s see what happens…
 
how did you mount the garmin in your previous chassis? the positioning looks really nice as a compromise of 'being able to see it' vs 'not being in marshalls faces when pulling out of the pit lane'
 
Trim to the front removable dash and then bolted to the plastic at the bottom, don’t seem to have any images without it attached.

25C92790-418A-40BF-A6C7-107624E13B78.jpeg
 
ahh you changed it from the images i saw - previously looked like it was somehow mounted left of the dash. i think i need to keep all the various dash bits, so was looking to mount it on the side somewhere.

took me a while to realise the catalyst uses all of the same garmin 'RAM' mount system, so you can just buy cheap ball mounts of various types to build what you want.

also congrats on the new baby! got mine due in July. lets hope we can all continue with track fun on no sleep..
 
At yeah, I had it bolted to the front, yeah I am fairly sure all Garmin is just ram mounts.

10C67439-F18F-4615-BC60-00B84136545E.jpeg

Congrats as well, I am struggling to keep up with two!
 
  • Like
Reactions: Onrus
Hours/days spent but looks like I have done nothing...

IMG_7553.jpeg

IMG_7616.jpeg

IMG_7657.jpeg

IMG_7607.jpeg

Engine block cleaned and lifted into the golf, the front of the block looks terrible but rear looks good, engine crane did this job perfectly. Still waiting on various replacement parts for the engine so that is currently on hold / I need to drop it off to be honed/hot tanked however I have been able to get the frontend back together.

IMG_7740.jpeg

OS damper replaced by cooksport as the damage was just a bit too much to fix, would have cost double the price however the NS was put on the dyno and all good. Rebuilt a cheap hub from eBay with new swivels and machined down the top to allow the dampers to sit flush giving me the extra 10mm of bump.

IMG_7643.jpeg

IMG_7749.jpeg

IMG_7784.jpeg

Subframe and hubs all went on with no issues, satisfying to get this far but then slightly depressing that if I had engine she would be ready to go.

IMG_7823.jpeg

IMG_7723.jpeg

IMG_7829.jpeg

500x600mm heat shield installed, cardboard template worked well to get it fitting nicely with existing shields, talking to Nick at PMS I am not going to wrap the manifold.

IMG_7800.jpeg

IMG_7691.jpeg

IMG_7697.jpeg

IMG_7701.jpeg

100 rivnuts later and the loom was almost back to how I had it in v1, got a few ideas for how I want the cutoff/switches to work as I don’t trust the dashboard anymore. I have a ‘braking fault’ error but I think this is due to the various parts missing on the engine side, to be ignored for now.

IMG_7683.jpeg

IMG_7715.jpeg

Replacement axle courtesy of Alex at AW and a new disk but I have a noticeable amount of tow out still on the drivers side (barrier..) Obviously need to wait till the car is weighted but something has bent, the damper sits correctly (no rubbing on shell) so I think I can shim this back as I really don’t want to replace it after just having all the work done. Job for the next couple of weeks to see what I can do before giving up, very difficult to work it out and tbh it might even be the 10mm spacer (wishful thinking)

Had a bottle collecting the fuel as I was testing the loom and the petrol is very green/yellow, slightly concerning so going to flush it through with some fresh vpower, I think the tank is now empty so can only assume it was the dregs.
 
Your behaviour during the whole thing should be used as a tutorial in relation to safety and how to (re)act. Good to see and know it went that well considering that hefty crash.

I wish you all the best and better luck with the new one.
 
  • Like
Reactions: LiamP and deekay16v
Took Friday afternoon off to do some bits, it didn’t go very well.

1C7B1DE8-CA4A-456E-A6B8-7ACBAEF9113C.jpeg

CA79B734-5A03-4391-ABFF-6504838A8CC6.jpeg

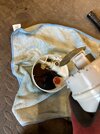
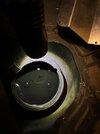
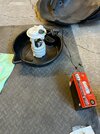
Took the fuel pump out to isolate the green fuel issue, both the pump and tank where completely full of what looks like half dissolved black plastic, note that these both came with the shell (good luck to the current owner of the unopened supercharged engine)

Angrily chucked the pump into the bin and set about cleaning the tank, not easy or fun with it installed and a good 5 litres of fuel still present. 1 hour later I finally had it emptied and clean of what ever had been dissolving inside. Tested my old pump and it was pumping out black fuel, into the bin as well.

EE3AC8DA-1672-45E8-9645-6BAFA506AEEB.jpeg

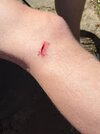
Went to wash my hands and walked into my old shell, the aluminium crash beam had decided it hadn’t finished with me cutting a nice chunk out of my leg resulting in a trip to A&E. 2 hours and had achieved almost fuck all.

3108FF74-03C0-4A5D-8FAF-E11C7371FE58.jpeg