My First Renault - Clio 197 Weekend/Track Toy Project

A bit more progress has been made. One of these arrived from SWMotorSports...

kTT8SMR.jpg

Found some rusty bits under the heatshield below the boot floor.
uzlDYJm.jpg

All the rust has been treated and the entire boot floor has been coated with Hammerite Underbody Seal.
IfQeLgV.jpg

Eyebolt anchor points are in for the harness lap-straps.
0mnyno3.jpg

New Powerflex bushes in the rear axle.
FSaWgNk.jpg

Just in the process of putting everything back together. More to follow.
 
Nice work!! Loving the diy snips.

Quick question, how much pain was involved with removing the old Bushes ? I've had a set sitting on the shelf for a while and have been toying with the idea, but have heard it's a pig of a job and doesn't yield much benefit.

Sent from my Pixel 3 using Tapatalk
 
Nice work!! Loving the diy snips.

Quick question, how much pain was involved with removing the old Bushes ? I've had a set sitting on the shelf for a while and have been toying with the idea, but have heard it's a pig of a job and doesn't yield much benefit.

Sent from my Pixel 3 using Tapatalk

Hi, yeah, I've read similar. I wouldn't have replaced them but the original rubber ones were badly split. What started off as replacement of the rear shocks turned into a complete refresh of the rear axle. Getting the beam off without a proper two post lift and component jack(s) is a bit of a pain. Would be easier if you had someone to help you. There is a section in the service manual which covers removal of the entire rear axle as a complete unit. I opted to strip everything down so I could just take out the beam without the stub axles, brake calipers and discs etc just to reduce the weight of it.

Once it was out, getting the old bearings out was a pain too. I used a combination of hammers, chisels, drills, heat, penetrating oil, swearing, fire a bi-metal hole saw and more swearing and finally got them out. Absolutely covered myself and a lot of my tools in melted rubber in the process. At one point I did ask a local garage if they could do it for me because I was losing the will to live. They said they didn't have a big enough press that they could fit it in.
 
Another quick update. Back end is mostly back together now with:

  • New Cup Shocks
  • New OEM Calipers (drivers side let go and started pissing fluid out of the piston seal and they'd been refurbished once)
  • New PBS ProTrack Pads
  • New OEM Rear discs
  • New handbrake cables
  • New Powerflex bushes
  • Pure 1deg Camber Shims
  • Lots of cleaned up, painted and undersealed parts.
Gr67rTR.jpg

Yr37jsq.jpg

FEwTUvI.jpg
 
Hi, yeah, I've read similar. I wouldn't have replaced them but the original rubber ones were badly split. What started off as replacement of the rear shocks turned into a complete refresh of the rear axle. Getting the beam off without a proper two post lift and component jack(s) is a bit of a pain. Would be easier if you had someone to help you. There is a section in the service manual which covers removal of the entire rear axle as a complete unit. I opted to strip everything down so I could just take out the beam without the stub axles, brake calipers and discs etc just to reduce the weight of it.

Once it was out, getting the old bearings out was a pain too. I used a combination of hammers, chisels, drills, heat, penetrating oil, swearing, fire a bi-metal hole saw and more swearing and finally got them out. Absolutely covered myself and a lot of my tools in melted rubber in the process. At one point I did ask a local garage if they could do it for me because I was losing the will to live. They said they didn't have a big enough press that they could fit it in.
No thanks I think I'll put that job aside for when I'm really desperate for things to do.

Sent from my Pixel 3 using Tapatalk
 
  • Like
Reactions: bigsid
Great thread! following with keen interest, hoping to do some similar stuff to mine (although probably more 'clubsport' than track-only at this point).

Did you change the discs/pads at all? trying to settle on something streetable but track biased, seems like perhaps brembo HC + ds2500 is the middleground at this point.

EDIT: i see you got new rear bits, oem front still? keen to hear how you get on with them.
 
  • Like
Reactions: bigsid
Hi, I’ve taken off old grooved and cross-drilled discs of unknown make and origin and brembo pads and replaced with HC brembo front discs and winmax w5 pads and on the rear oem discs and pbs pro track pads will let you know how they perform.


Sent from my iPhone using Tapatalk
 
  • Like
Reactions: jimmybell
Another little update. Tried to fit the roll cage this weekend. Spent ages trying to get the thing into position and became convinced SWMotorSports had sent me the wrong one. It just would not fit. I was just about to write a strongly worded email when it suddenly dawned on my that I was trying to fit the cage back to front...

IyFY8RQ.jpg

After coming to terms with being a f*@king idiot, I got it out, turned it round a tried fitting it the right way round.

Kbxv65i.jpg


Much better. Just need to drill all the holes and bolt it in.

UFh3Gzz.jpg


I've ordered some materials to make some additional mounting brackets for the cages main hoop to reuse the top and bottom B-pillar seatbelt mounts. Hopefully this will give a bit more rigidity to the shell. I'm taking some inspiration from the Bargain Racement videos by Bad Obsession Motorsport.

Finally, I did the "weight reduction" and re-paint of the rear diffuser brackets. Welded some captive nuts onto the bottom as the original ones has sheared off rusted bolts in them and had had small holes drilled in for screws.

TpQrF3O.png


Did a couple of other bits too. Removed the rear window washer tube and blanked it off at the pump. Removed the aerial and cable as there's no radio. will post some more pics next weekend.
 
I'd had an advisory on the MOT a few months back of play in both inner tie rods. This had been an advisory on the previous MOT also. So, I thought I'd get that sorted and freshen up a few of the other shitty front suspension components.

OZB0vzT.jpg


New inner tie rods, track rod ends and anti-rotation links along side the shittiest track rod end removal tool (Neilsen on Amazon.. avoid, didn't work, sent it back for a refund. Forked out £65 notes on a Laser one which worked perfectly).

Exhaust removal wasn't purely for weird OCD reasons. I did need to replace a broken C-Clamp on the de-cat pipe and I also needed to remove a big section of heat shield to get to the underside of the exhaust tunnel as I need to put spreader plates on for my hardness lap-strap eye bolts. So this came off...

ylnAIJh.jpg

I can't fit the harnesses until the seat arrive and I can position everything properly. In the meantime I worked on a couple of mods. Got the custom 3D printed fog light brake cooling scoops mounted.
kGtXu6f.jpg

094zc3g.jpg

No idea yet how I'm going to route the ducting. Open to suggestions. I've also made another little mod, again to hopefully aid with brake cooling.
Ls2VaTE.jpg

b5yN9jb.jpg

1uZc6M8.jpg

Hopefully these should give hot air a way to escape more efficiently. Should get sucked out by the lower pressure behind the wing vent. It also makes those wing vents properly functional. Basically LMP style aero package more or less....

Anyway, critique welcome.

I may be wrong but as far as im aware the vents in the wings are there to draw air out of the engine bay air comes in the front and drawn out the sides
 
Hmm, there don't seem to be any holes on the inner wings which would allow air through to those vents, but either way, having the hole in the arch liners shouldn't create a problem if they are somehow sucking hot air out of the engine bay. I'll check tomorrow and see if I can get some pictures. Thanks for the heads up though.
 
  • Like
Reactions: adam thomas
Hmm, there don't seem to be any holes on the inner wings which would allow air through to those vents, but either way, having the hole in the arch liners shouldn't create a problem if they are somehow sucking hot air out of the engine bay. I'll check tomorrow and see if I can get some pictures. Thanks for the heads up though.
Yeah its an interesting one but its just something I have read at some point [emoji1787]

Sent from my SM-G981B using Tapatalk
 
The vents are to exhaust engine bay heat, there isn’t a specific hole between the engine bay and the wheel arch vent but there is plenty of gaps for it to make its way out. Don’t know how effective it is but it does do something. Some Renault literature claims it compensates for the increased drag created by the wider wheel arches than a standard Clio.
 
  • Like
Reactions: adam thomas
Thanks chaps. I'll keep an eye on this. Hopefully having the grill in the arch liner won't disrupt the airflow and cause any heat issues in the engine bay. In the meantime, I've got the half cage fully installed now...

YPFSbLu.jpg


cC83hKG.jpg

xdIUINb.jpg

43Dx9Uz.jpg

wspempa.jpg


I also treated myself to a rivnut gun, which is great, so I've got threaded inserts now I can use to bolt the footplates back in (instead of using self-tapping screws). It's also allowed me to be able to bolt some p-clips in so I can keep the wiring neat and tidy.

tk8hIuf.jpg

86FvVLr.jpg


Also, I've got a question. The cover over the fuel pump seems to be held in place by some gooey sealant type stuff. Since removing the back seats however it has a habit of springing up like the sealant has lost it's stickiness, which is why it's full ghetto mode covered in duct tape...

UlKhfjJ.png

Any idea what would be best to use to stick this back down properly but still allow it to be removed if I need to get to the pump?

Thanks in advance.
 
Cool! What’s the purpose of the white sauce on the external cage bolted plate? Kee seeing this and not sure what it’s for, figure ill need to copy that if i fit my own cage (albeit possibly i’ll use JP cage which uses the rear isofix points so perhaps less to drill?)
 
  • Like
Reactions: bigsid
Cool! What’s the purpose of the white sauce on the external cage bolted plate? Kee seeing this and not sure what it’s for, figure ill need to copy that if i fit my own cage (albeit possibly i’ll use JP cage which uses the rear isofix points so perhaps less to drill?)

Hi, it's polyurethane seam sealer to stop water getting trapped between the reinforcement plates and the body and causing rust. If the JP cage uses the isofix points, then yes you won't need to drill the rear arches, but I expect you'll still need to drill through the rear footwell floor for the feet of the main hoop. I went for the SWMotorsports cage which leaves more boot space accessible so I can still fit a set of spare wheels in for track days.
 
  • Like
Reactions: adam thomas
Hi, it's polyurethane seam sealer to stop water getting trapped between the reinforcement plates and the body and causing rust. If the JP cage uses the isofix points, then yes you won't need to drill the rear arches, but I expect you'll still need to drill through the rear footwell floor for the feet of the main hoop. I went for the SWMotorsports cage which leaves more boot space accessible so I can still fit a set of spare wheels in for track days.

Which make did you use please? As I need some for some spreader plates myself.
Thanks
 
  • Like
Reactions: adam thomas
Which make did you use please? As I need some for some spreader plates myself.
Thanks

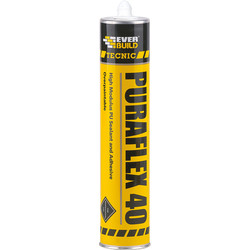
I used Upol Tiger Seal first which is about £9 a tube on eBay. I used that a couple of weeks back to do the eye bolt spreader plates for the harness lap straps. Thought I had sealed up the tube properly, but by the time I came to use it again, the entire tube had set into a solid block of rubber, so for the cage plates I used Puraflex 40 which I can get from Toolstation for just over a fiver...


Apparently they use this stuff to seal shipping containers, so I thought it should be up to the job of being stuck under a car.
 
  • Like
Reactions: suj