Tom's Track Car - BMW E46 -Engine Number 3

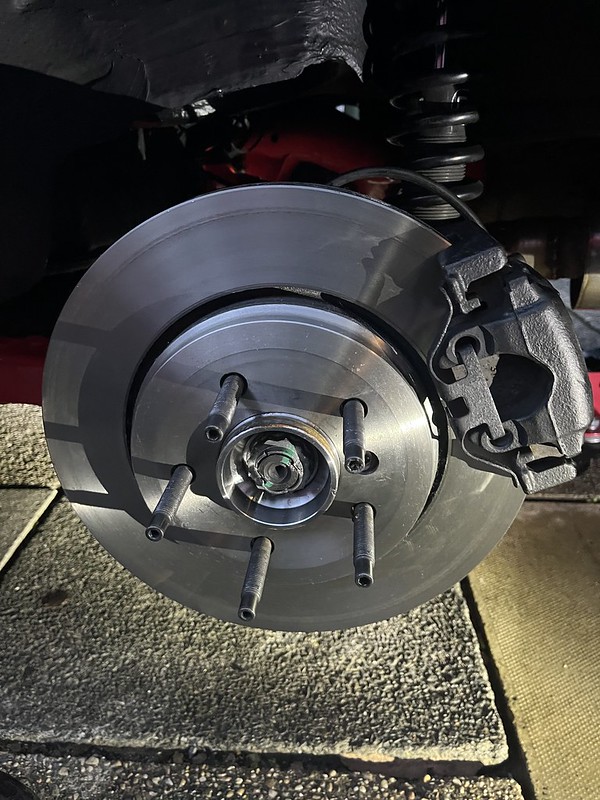
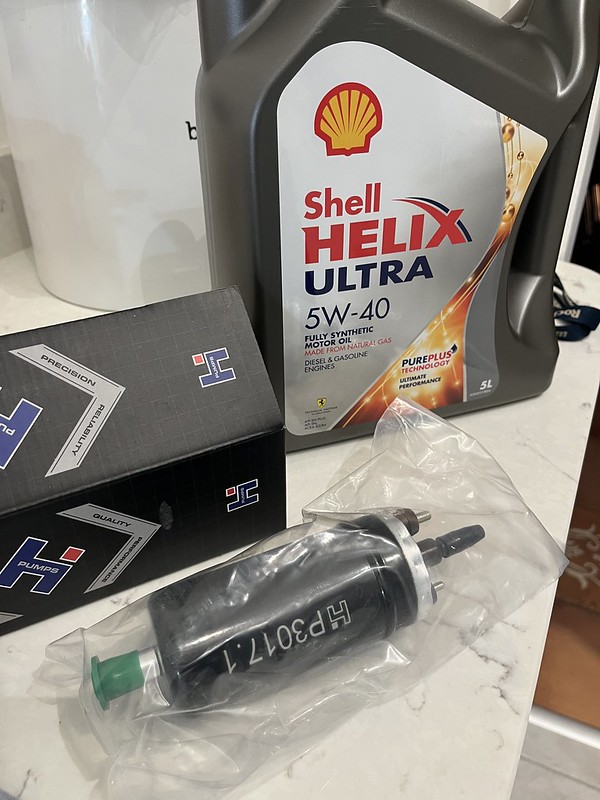
Small update from this week and weekend.
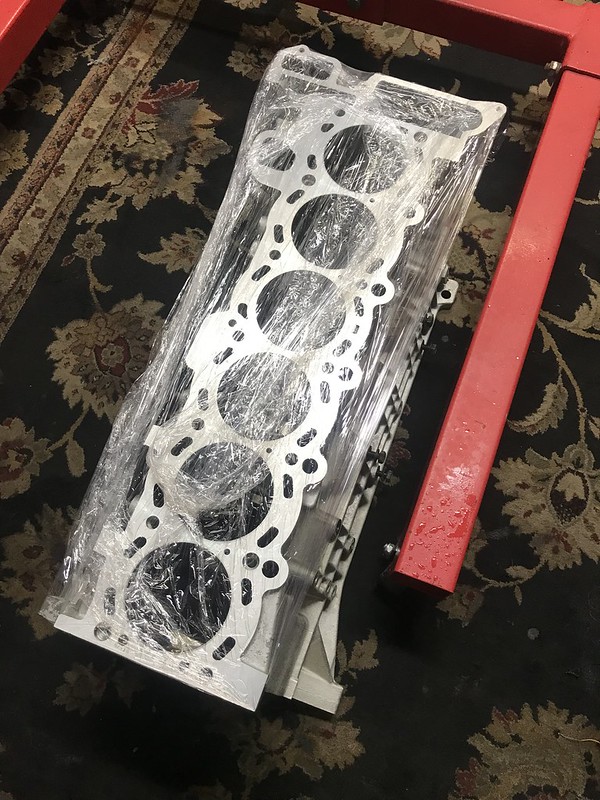
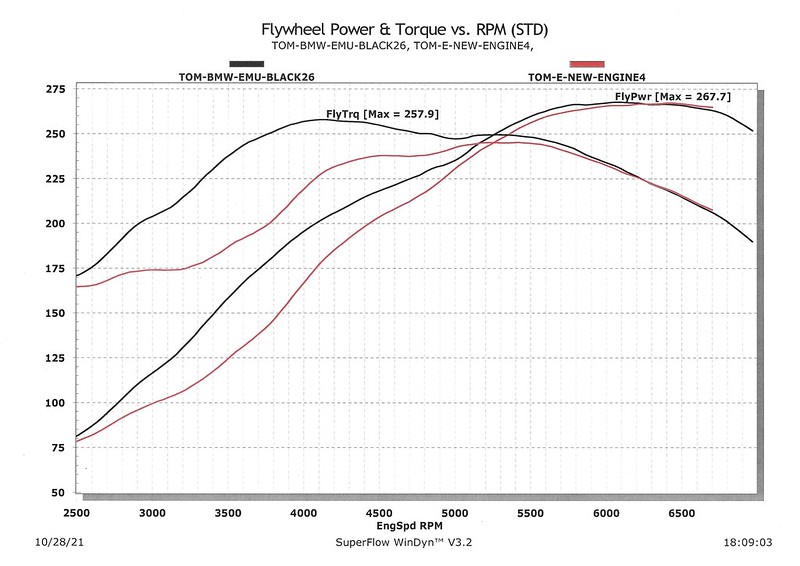
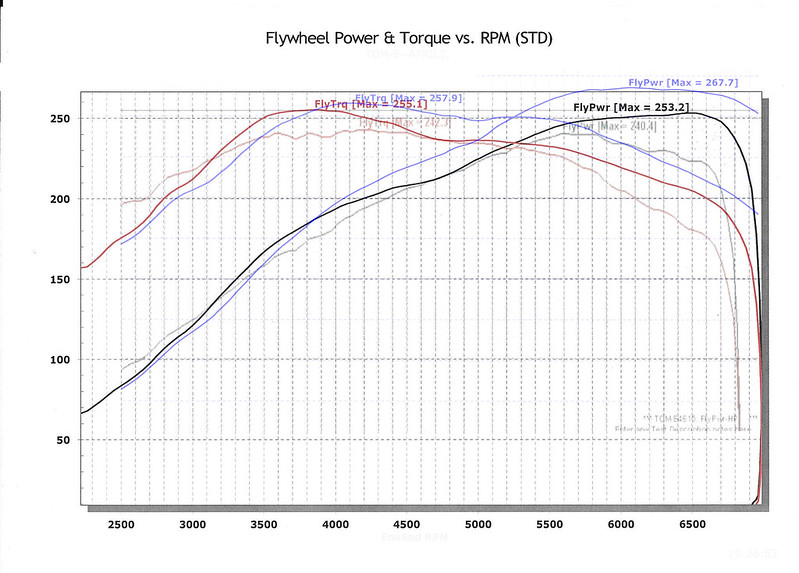
Got the block dropped off at a new machine shop for them to rehone and have a look at the condition of the bores. The outcome of this was that the current piston to wall clearance is on average 0.06-0.07 but the bores are slightly tapered, not well honed and the machine shop are off the opinion that another 0.1 will be required to get the bores round and cylindrical. Taking the cylinder to wall clearance higher than the 0.15mm max spec from BMW. This would possibly lead to further issues in the future.

Off the back of this I spent the end of the week looking for a replacement block, actually found it very hard to find a replacement, kicking myself that I sold my old engine on for a good price last year! I really wish I hadn't now!

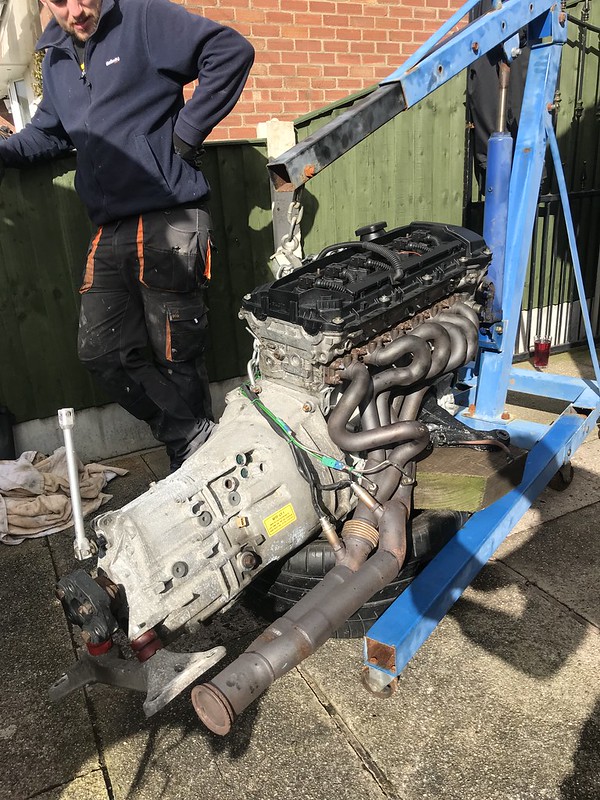
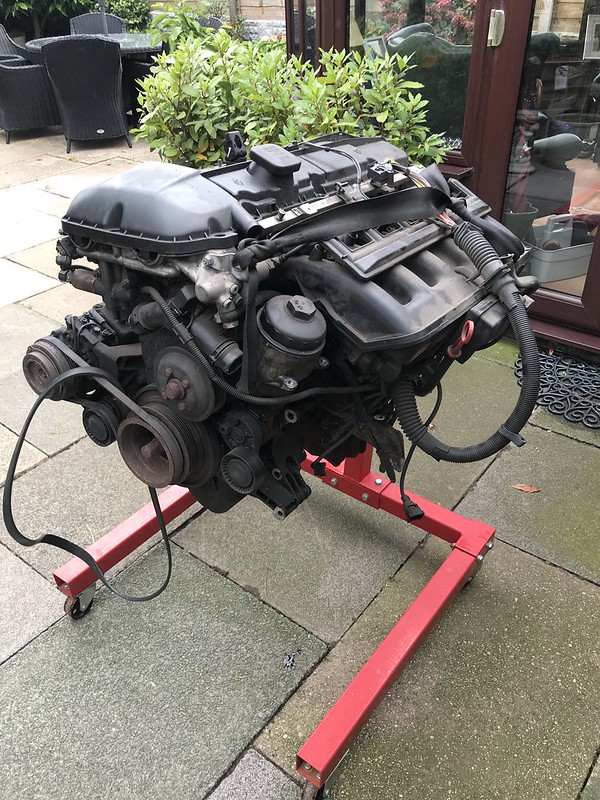
Found myself an engine as finding a decent block with main caps and front timing cover was harder than I expected.
Picked up the engine in the back of van.

51494415010_0891491260_c.jpg


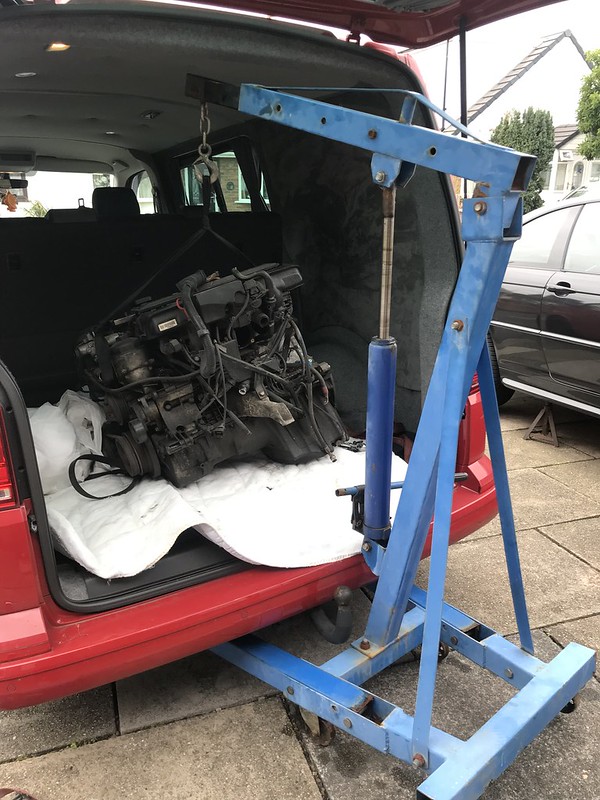
Dirty old mess of an engine, according to the seller it was a unopened engine 100k miles.
51494415620_066ff2a780_c.jpg


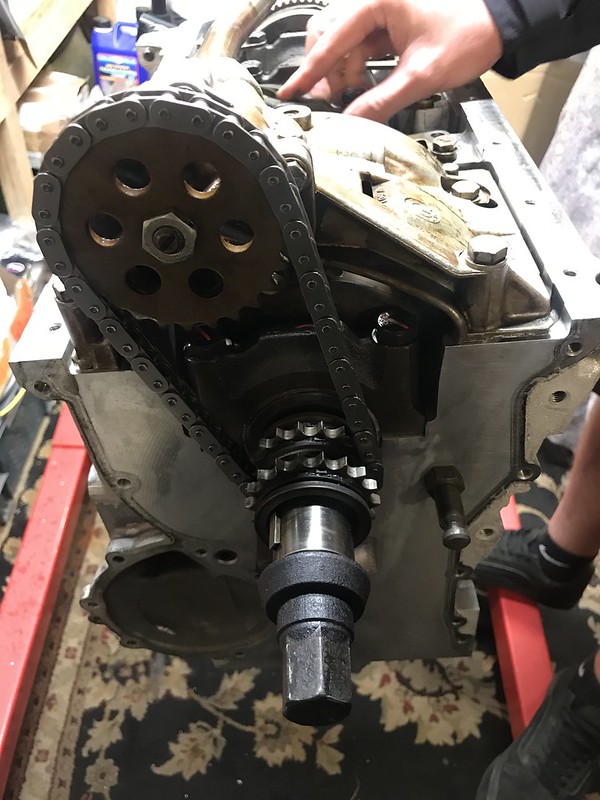
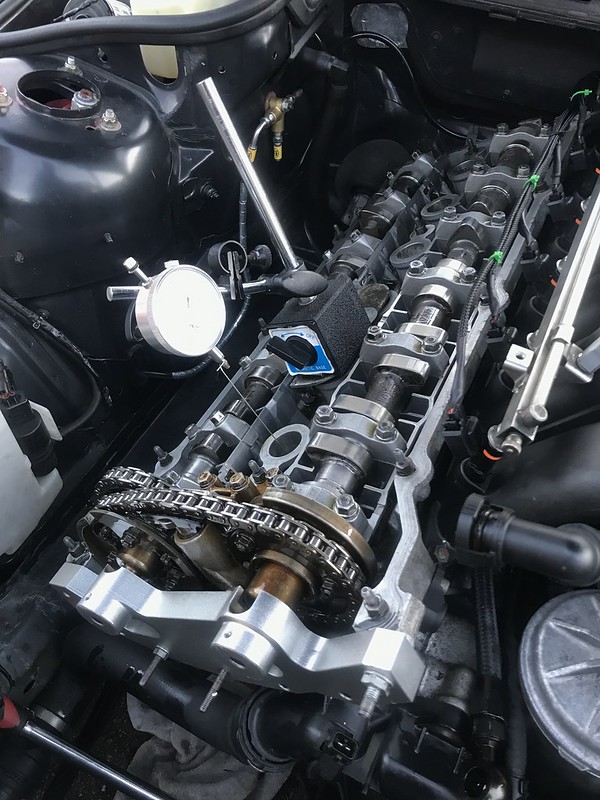
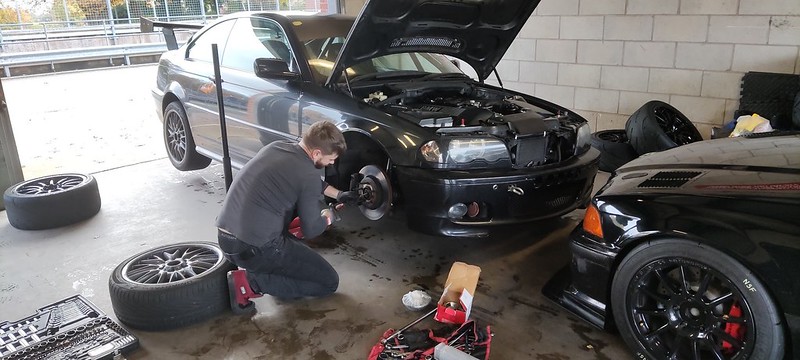
I know my way around these pretty well now so it was easy pickings to get it stripped down, I just wanted to get a look inside the engine to see what the bores looked like and if the engine was even useable.
51494415495_aaa528ef68_c.jpg


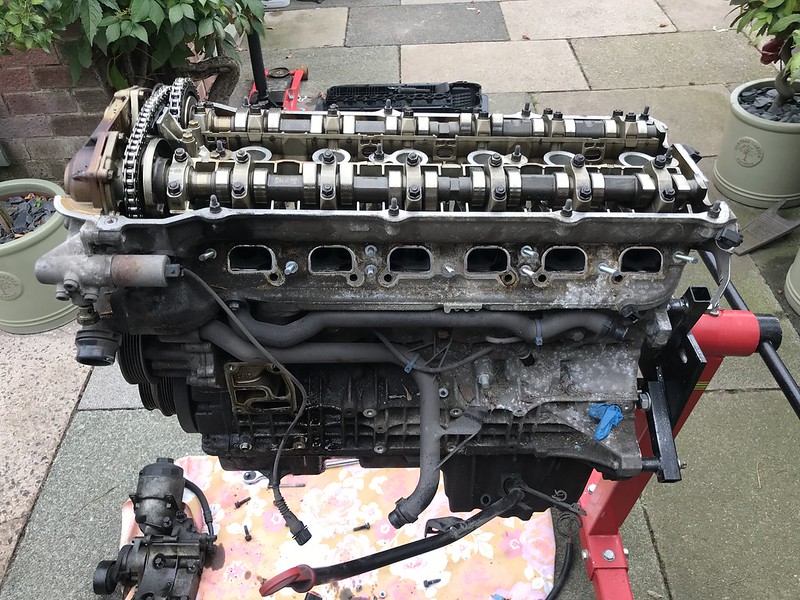
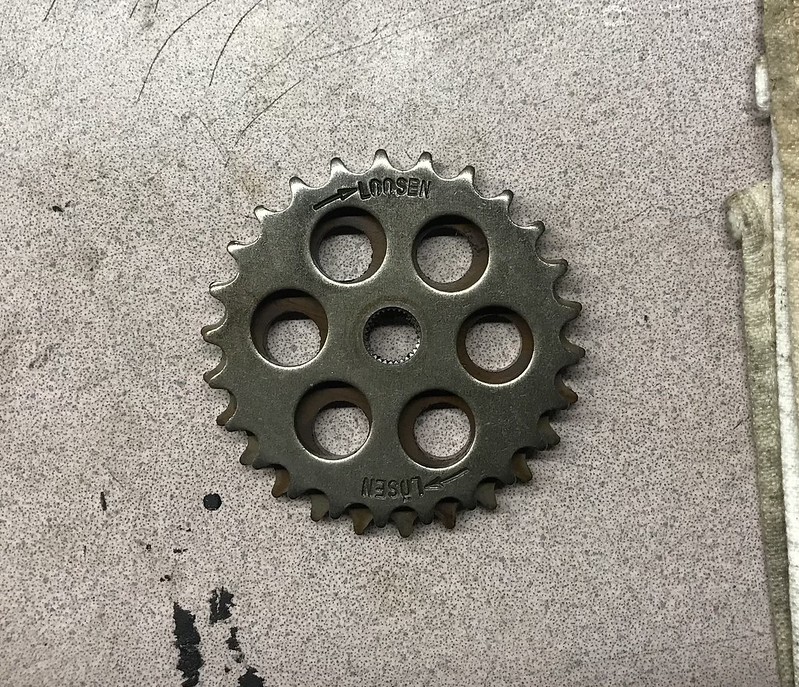
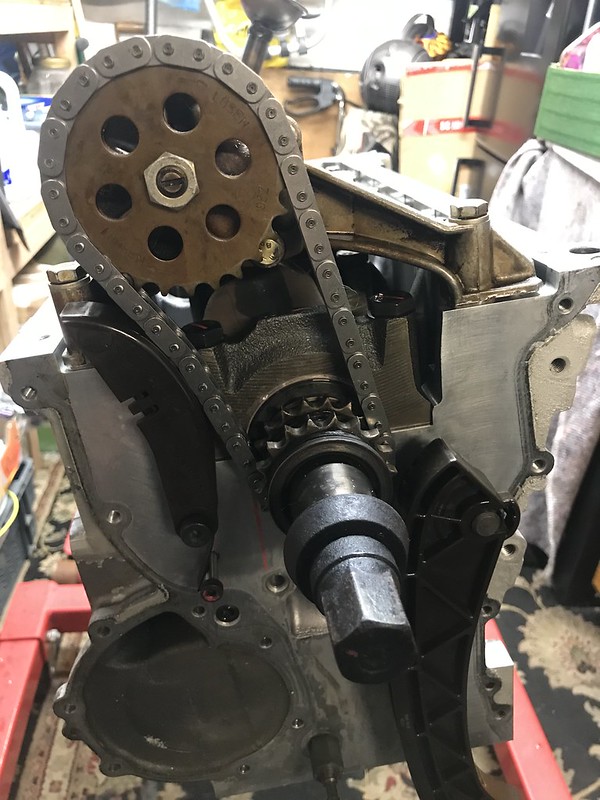
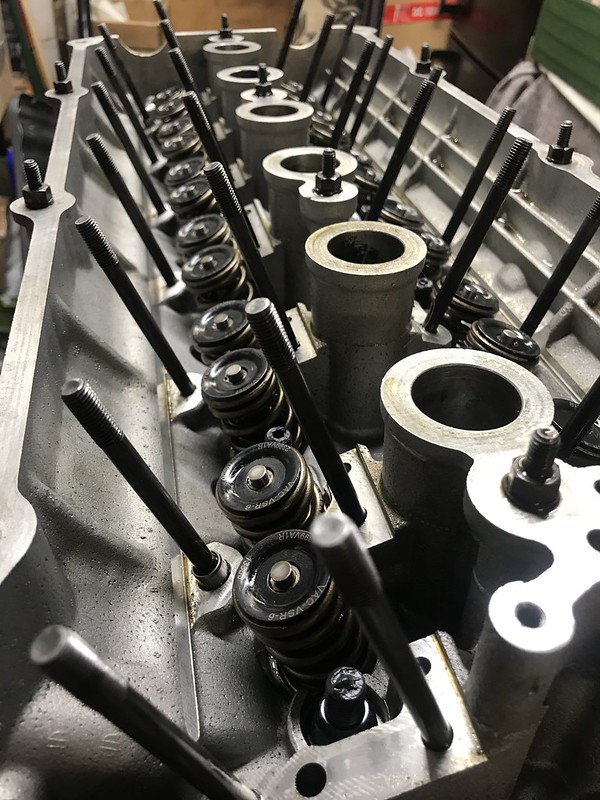
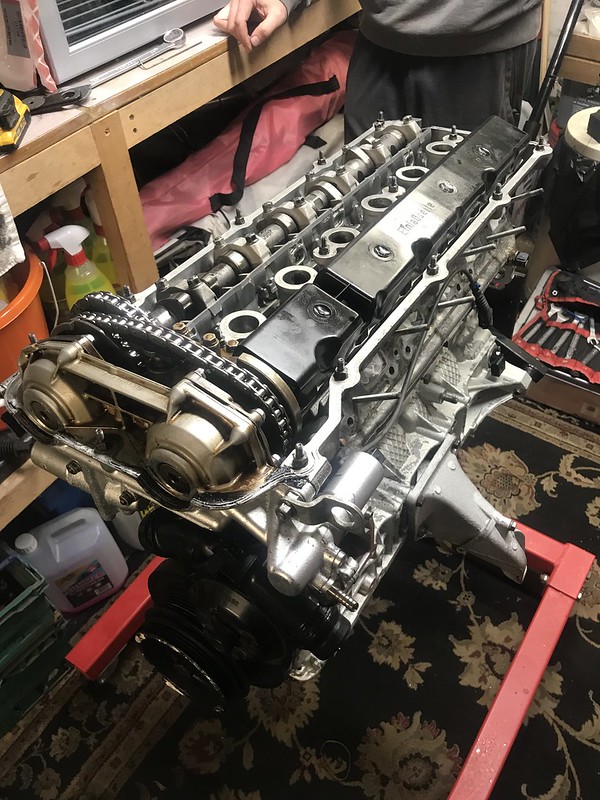
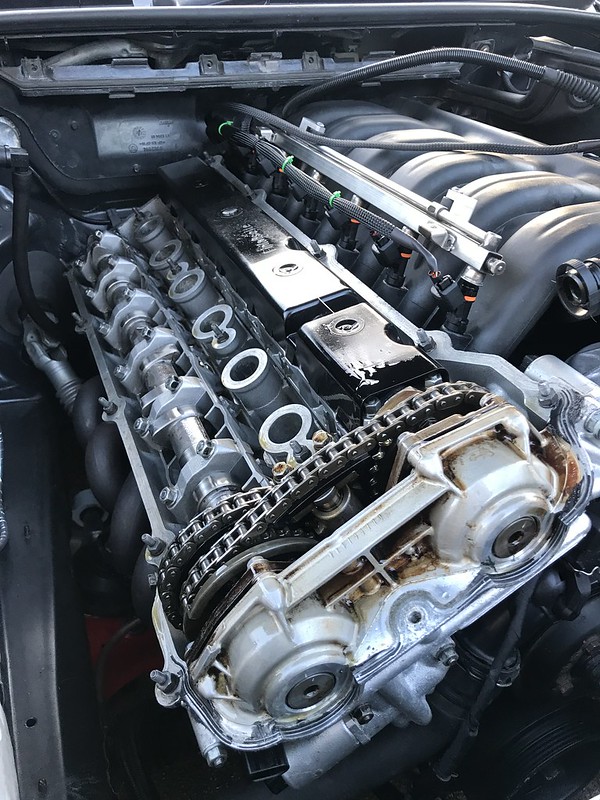
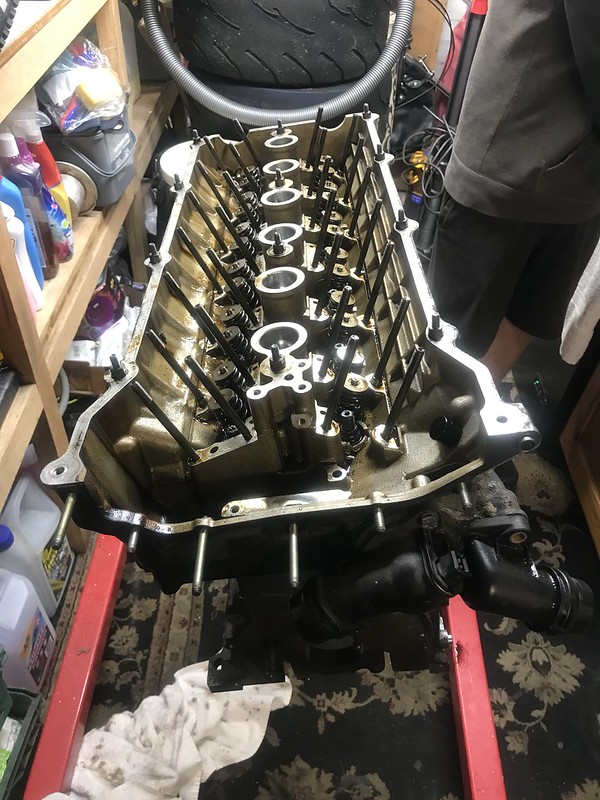
Cams out of the way the last step was to pull the head off.
51493489011_14f622a721_c.jpg


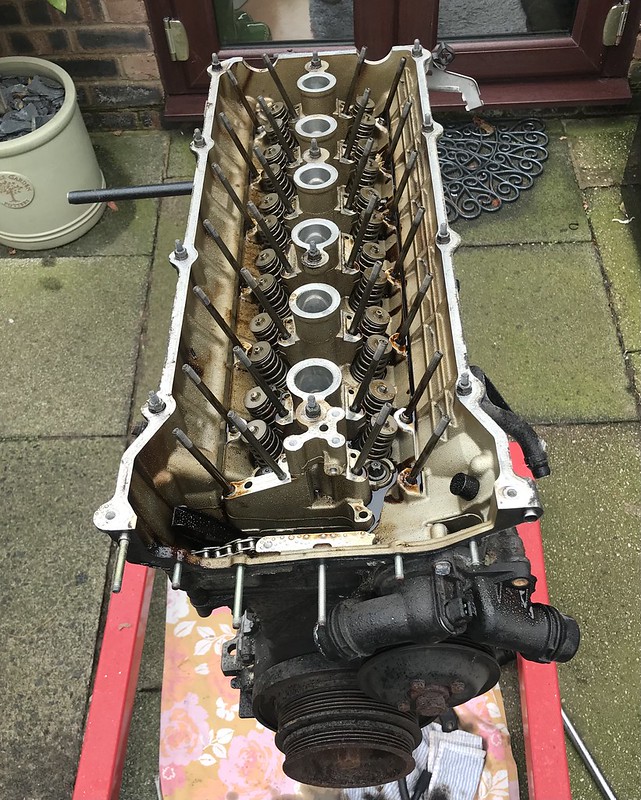
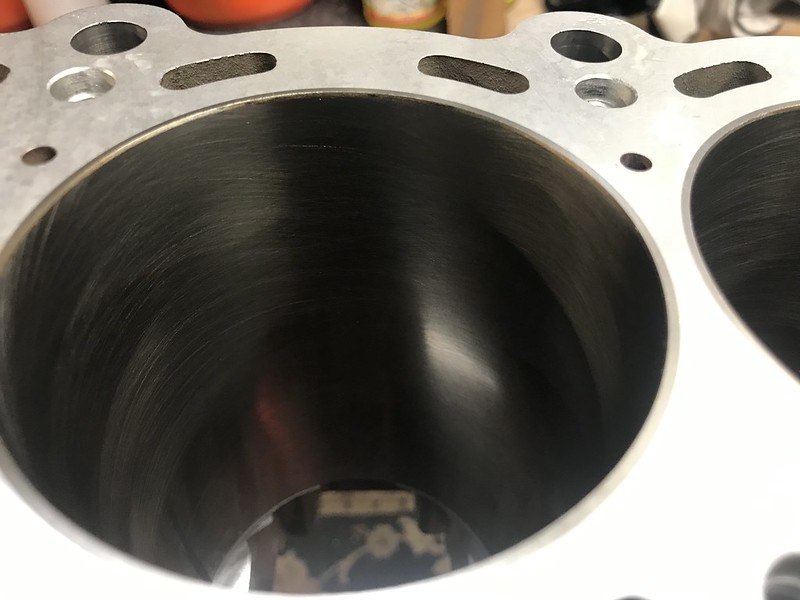
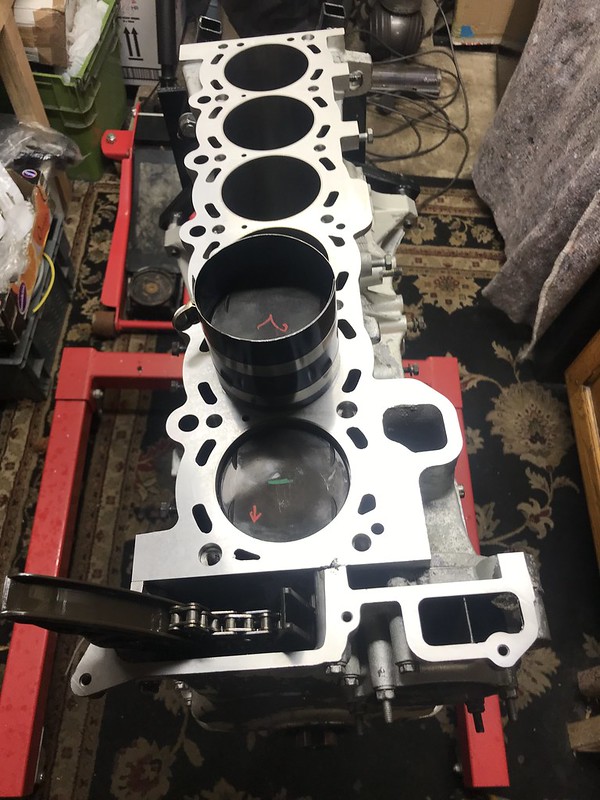
With the head off it was clear to see the inside of the engine was nice and clear with the piston walls looking perfect.
51492692897_17b24db387_c.jpg


At this point I was feeling pretty positive about the outcome here, however this was to be short lived.
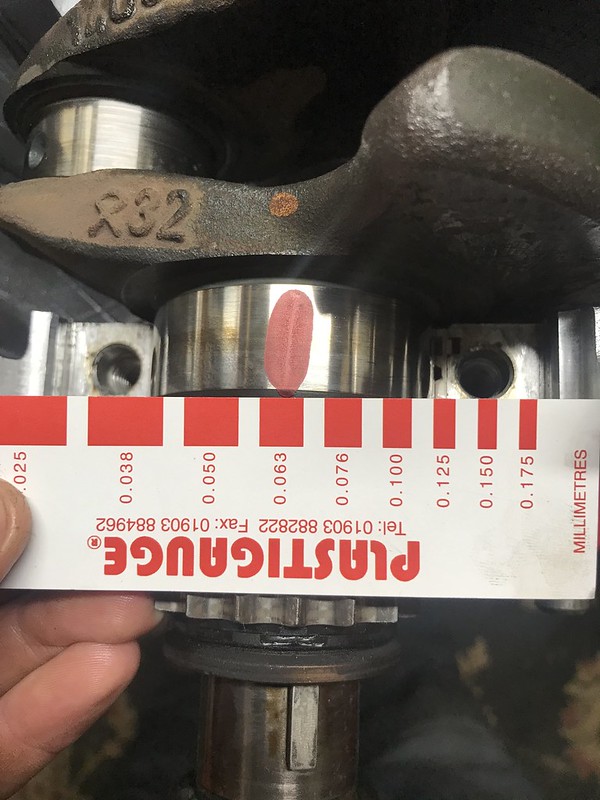
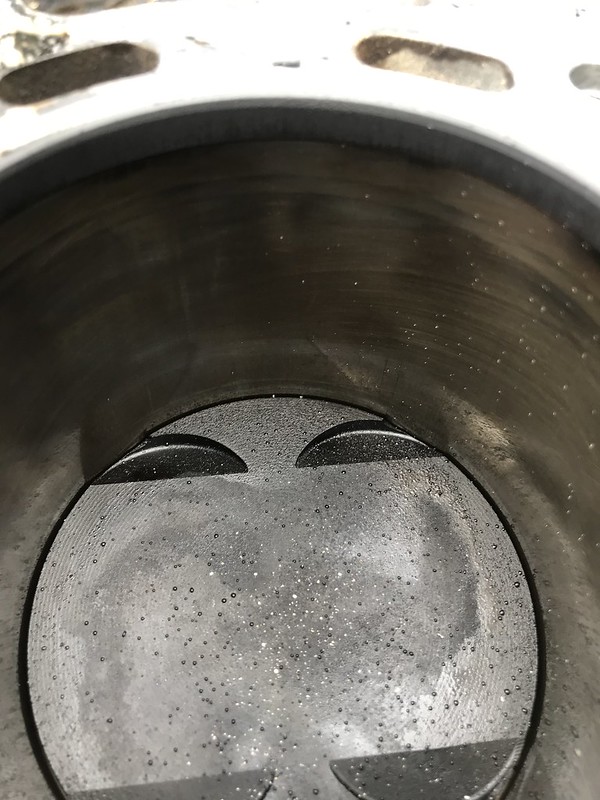
Upon measuring the engine with a bore gauge it was clear that two of the cylinder was completely oval measuring less than 84mm front to back and over 84.2 across the exhaust to inlet side of the block.
We went back, checked the calibration of the equipment, measured the other bores again, still the same readings. Considering my old block had a max bore size of 84.02mm (0.07mm clearance)
Checked the main caps were torqued to spec, no difference to the readings.

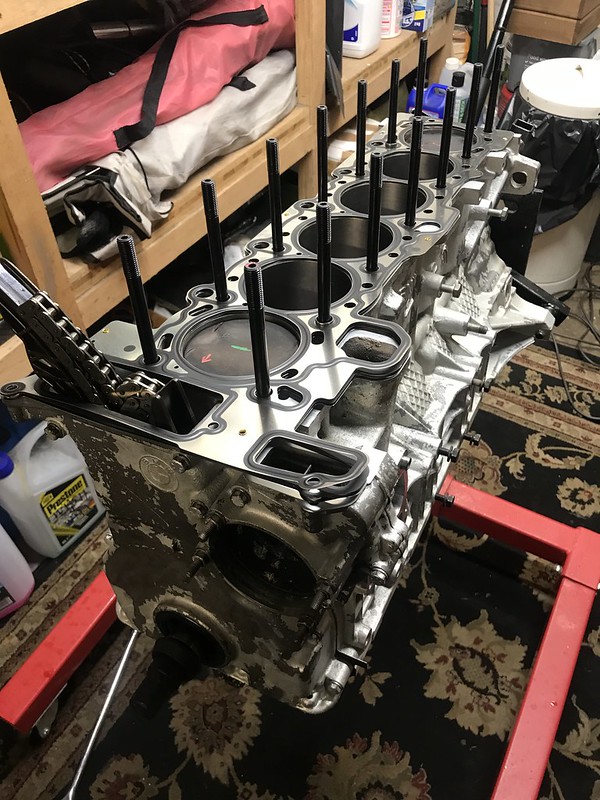
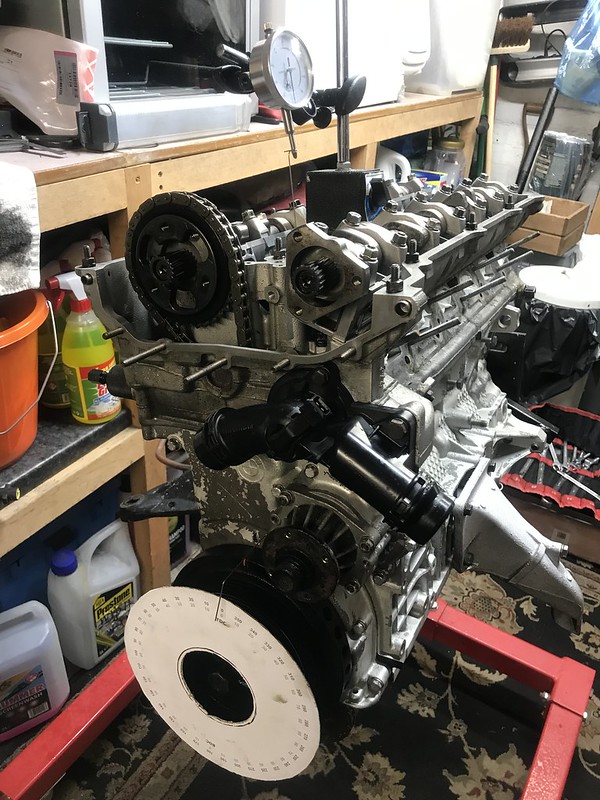
We went down the route of exploring how much difference it makes having the head torqued down or using a torque place to simulate the pressure from the head being torqued. To do this with the crank removed I put the head back on with the old crushed head gaskets but dropped in my ARP headbolts with the longer thread engagement for the Aluminum M54 block and started to torque down the head studs so we could measure the bores from the underside with the crank removed.

51494198259_18b432474a_c.jpg


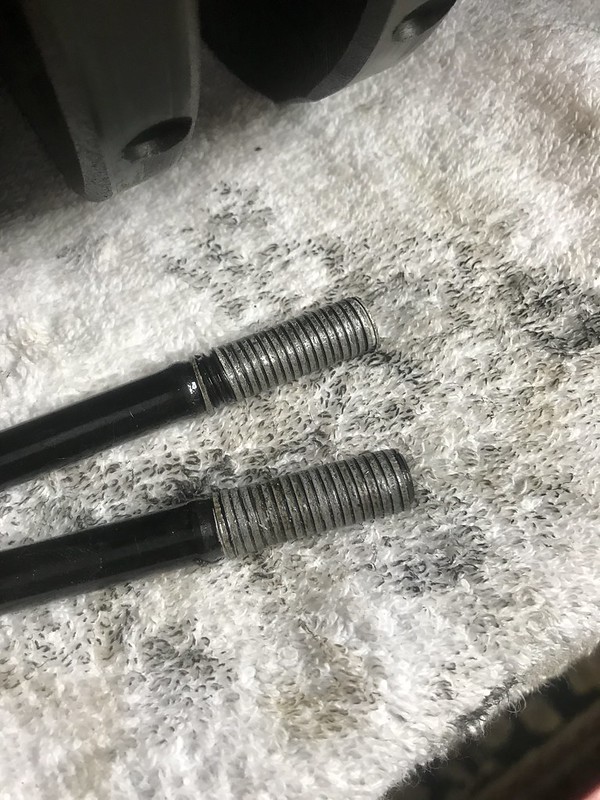
Ping... Ping... Two of the studs never made it to 100nm as per ARP instructions and two of the threads pulled out of the block. The ARP's with the longer engagement are supposed to stop this, weirdly the two studs which did pull out were right next to the exhaust side of the most oval cylinder so I'm assuming that this engine has seen a lot of head at some point in it's life which has damaged the cylinders leading to them going oval as well as damaging the metal around the threads.
51494198209_611d6a072d_c.jpg


Did a quick measure of the bores from the underside and saw very little change in the bore dimensions, however it wasn't a perfect test due to two studs pulling the threads out of the block.

At the moment I now have reduced confidence in the torqueing down the head on the M54's even with the ARP's, however before that I don't even have a working block at the moment so I'm going to see what the machine shop recommend to stay within the BMW specs as well as keeping my eyes open for another block in the next few days but at the moment the E46 is retired for the remainder of the year until a reliable engine solution can be found and then I can build a new engine and go from there.
 
Here's a block

Cheers Sean.
I’ve messaged all sellers on eBay with blocks and reasonable engines regarding photos of bores, if they have main caps and timing cases, just see who comes back to me this week. Hopefully some of the breakers pick up the message tomorrow.
Not been brought up with the original shop. It’s a year on now, just focusing on getting it sorted and right for the future now. I think finding a good quality block that’s not worn and warped now is going to be difficult when the tolerances are so small. Especially when these are 20 years old now some of them.
 
  • Like
Reactions: Sean197 and suj
I don't know the costs involved so it could be a pipe dream, but would you be able to get the block bored out and go for oversized pistons? Or does that open a whole new world of hurt?
 
I don't know the costs involved so it could be a pipe dream, but would you be able to get the block bored out and go for oversized pistons? Or does that open a whole new world of hurt?

Possible? Yes..
However when I checked you're into over £600 for OEM pistons and rings plus machine work. Zero gain except 0.25mm bigger pistons. Anything above that and the liners in the block are to thin.
You could go after market and get higher compression pistons but the costs are £1200+ and machining on top of that.

See what happens if I manage the find a block in the next week but it's likely to be a rebuild over winter.

What about an N series motor?

Or K series :smilingimp:


I've had some experience of the K series motor and it was way more unreliable than the M5x series. Wouldn't turn down the displacement or the 6 cylinders that makes more power than a K.
N series possibly if I didn't have all the head and cams from the M series and obviously nothing carries over.
 
  • Like
Reactions: bedoef
Back to it again. Since the last post I have sourced another bare engine block which was in the similar condition to my standard block and decided on the Saturday to take them down to a new machine shop to compare blocks. In the end we decided to stick with the original block, it was determined that when the engine was machine last year by the old machine shop that the bores were purely deglazed and weren't round as material hadn't been removed from the entire bore.
I left the machine shop with the instructions to do their magic with their honing to get the bores round and to finish with a plateau hone. The clearances would be a little larger than I would have preferred but they measured just inside BMW piston to wall clearance, considering I wasn't going to find a better block and the application I have decided to go with it, to get perfect cylinder wall clearance it would be oversize pistons or liners in the block.

On the Thursday I got back a the block, honed, skimmed and cleaned.
51574357618_db0ec8aee8_c.jpg


Initial observations are that the hone is much finer, not as deep and course and the angles of the hone look more consistent.
51575040765_357381823d_c.jpg


Side by side comparison
https://live.staticflickr.com/65535/51574813664_018454315e_c.jpg[img]

First job of the Thursday evening was to get the cranks in with the new bearings and check the tolerance.
[img]https://live.staticflickr.com/65535/51574116836_bb5b4c8476_c.jpg

51575048130_6fa35997e6_c.jpg


With the crank in the engine the next job was the look at the oil pump, the whole reason I took the engine out in the first place.
I mocked up the oil pump with a new chain and an M54 sprocket
Nice to see the chain looking a lot tighter on the gears again
51575041130_d25bed1594_c.jpg


However I knew the chain was super slack when I had to do the quick oil pump fix before Snetterton. Turns out when comparing the E36 vs the E46 sprockets that there is one tooth difference between them with the E36 being slightly smaller. This accounts for the difference in chain slack.
51575082010_9af5a9c435_c.jpg


Little bit of marking out and with the help of a 3D Printing jig I drilled the tapped the block for a BMW Oil Pump Tensioner, at the moment I am keeping with the standard oil pump shaft due to the failure of the two vac shafts.
51575040945_6b63f10146_c.jpg


Popping the pistons back into the block with new rings. Rings gapped up just below the BMW ring tolerance
51574357303_a4764b43b4_c.jpg


Head gasket and ARP Studs. I did do a comparison between these M54 ARP head studs and they are slightly longer than the M54 studs in terms of thread engagement and the actual stud length of longer too to suit the M54 heads.
51574801684_4dfe10dced_c.jpg


Then came the moment of truth, I dropped the head on into position, making sure all the contact areas were spotless and clean with brake cleaner, applying the correct ARP grease to the head studs and bolts and then started the process to torque down the head.
51573310002_df77658f9f_c.jpg


Little look at the goodness that lies within the head, the VAC Motorsport valve springs and retainers to suit the larger lift Schrick Cams.
51575041160_c6866f9d5a_c.jpg


The next morning I reassembled the head with cams and added a timing wheel to the front of the engine and set the engine at TDC referencing TDC on the timing wheel to be able to accurately set the cams to the correct centrelines as we found out they are slightly off from advertised in the data sheets.
51574116161_e013c1e30f_c.jpg


Some custom printed timing blocks were used to give a reference to how I actually timed the cams up
Exhaust used a 4 degree retard block to bring it to 107 degrees Centreline.
51574800829_ffc5e46cf4_c.jpg


Inlet used a 8 degree advanced to bring it to 126 degree (Funnily the cams are supposed to be 126 degree centerline in the standard timed position - Nope!)
51574363958_4784b66b5a_c.jpg


By the Saturday night it was a finished engine ready to go back in the car
51575048145_350b1e0c3b_c.jpg


Same as usual I assembled as much of the engine as possible outside of the engine bay with the gearbox, manifolds, subframe and gearbox mount all fitted together.
51575041700_af6647f606_c.jpg


Decided to do everything by the book for this engine and bought some of the Millers running in oil on the recommendation of the machine shop who did the honing to help with the running in process.
51574801744_4b61407780_c.jpg


Finally by Sunday afternoon around 5pm the engine was back in and the car was running. I ran it for a couple of minutes on the drive to check the leaks, checked the basics on the laptop using INPA, I did have one minor issue with a throttle body fault but it was purely down to a wet connector from putting the engine back in in the rain.
51574357078_ebd96dab6f_c.jpg
 
Love it Tom, fingers crossed it all goes to plan, have you managed to get it mapped / checked since?

Also I spy a DSSR, I been eyeing up getting one myself whilst I refresh the gearbox bits.
 
Love it Tom, fingers crossed it all goes to plan, have you managed to get it mapped / checked since?

Also I spy a DSSR, I been eyeing up getting one myself whilst I refresh the gearbox bits.

The DSSR is great with my RTD shifter. Wouldn't be without it on one of these boxes.
I didn't have time last night to complete the rest of the update so saved it for this evening...

Following weekend comes around and it was time for running in. I have booked two slots within two weeks of each other, one to do running in of the engine on the standard ECU, this then gives me time to take the car away, swap the wiring and ECU over and then make sure all the parameters in the new ECU are correctly set up and be able to leave the car idling while I set them up without worrying, this would have been impossible on a brand new engine.

So on Saturday afternoon I took the car back to the usual rolling road to run it for an hour through a range of mixed loads and conditions just with the aim to run in the engine making sure the rings were bedded in correctly. We did 45 minutes of mixed load conditions, creating plenty of vacuum to seal the rings against the bores and followed it up with a couple of power runs at the end of the session, this was interested as I had timed the cams up manually and left the vanos solenoids unplugged so there was very little low down torque but above 5k the engine seems pretty promising.
51579148425_a185bc6099_c.jpg


Power run without any Vanos/VVT so lacking in the torque below 5k. Normally it makes peak torque around 4000rpm with the same torque to power ratio. Zero changes to the map just purely ran in on the old map. The AFR's do lean out around 5-6k which does highlight the fact that we're getting towards the maximum duty cycle for the current injectors but at this stage I just wanted the engine ran in correctly and tested
51578252411_5ebc386a87_c.jpg


Ordered a set of Bosch Injectors - 0280158117 - 550cc/min @ 3.5 bar - These have a built in calibration inside the ECU Master black
51575041800_4df3ea123c_c.jpg


The compliment this I also ordered some Bosch temperature sensors for water, oil and IAT. Once again these are selectable from the built in calibrations in the ECU.
51574800704_851d6bd532_c.jpg


Prior to building the new engine I had already stripped out my current wiring loom and acquired a spare loom to use for the dyno session. I started by removing all the the excess wiring that wasn't going to be used with the new ECU. I then mapped this out in excel with all the ECU connectors, pin numbers, descriptions and their locations in the engine loom.
From here I was then able to reallocate those pins into new locations on the new ECU.
I wanted to make the engine loom separate from the rest of the car so i've added in some plugs to make it modular.
12 pin connector to connect to the body of the car.
4 pin connector with spare power/ground/2x analog inputs for future use.
6 pin connector with the final connection to the fusebox and signals to relays
6 pin connector the wideband sensor in the exhaust after the collector for the two banks.
I started my new wiring at these plugs and then started to integrate this into the existing wiring loom
51575041735_0ac8ed75fc_c.jpg


These plugs then started to pin into the new ECU connectors. No braid or wrapping of the wiring yet until the loom is tested and the engine is running. I can tidy this up at a later date
51574356143_7390ee871c_c.jpg


Finally this evening I started to introduce the engine wiring harness into the ECU plugs
51578911884_c499bb8711_c.jpg


I have a couple of pins to finish off with the engine loom and complete the connections for common grounds and power but the engine loom is pretty much finished.
Hopefully towards the end of the week I will have the last pieces I am waiting for and I can drop the wiring into the engine bay, start to connect it up and finalise the layout and wire runs before starting to test the ECU functions.
I have spent a number of hours, well more than a hours building a base map for the ECU Master Black. I've used some similar engines for reference but I've built the map from scratch so I know what i've set up is correct and specific to this car.
 
Another week spending my evenings and any free time working on the car once again.
This week has been finishing off the wiring planning and finishing off the engine loom. A lot more time than I thought has gone into the planning of this as well as making of the loom and I was only modifying it not starting from scratch but I've changed quite a bit of it as i've worked through each wire.

So I started off on excel writing down pin by pin the functions of all the wires going to the standard ECU for each plug which went to the ECU. From this I was able to reallocate each of the wires to a new pin on the ECU Master ECU. I decided which grounds were going to be together like the crank and cam signals keeping them separate from all other sensors. The splitting the remaining sensors, EGT and Knock over the remaining grounds, doing the same with 5v feeds.

Here's an extract from the document to give you an idea.
51601117750_55662e16e7_c.jpg


One thing I wanted to do with this loom was have it easily removed from the engine bay so I decided to add in some addition plugs so the ECU loom could be separated from the body and power.
The grey plugs in the photos
12 pin is all body control, fan thermostat, throttle pedal etc
6 pin is for power to the ECU, fuel pump and main relay activation
4 pin is spare analog inputs 2x, sensor power and ground should they be needed in the future.
Black 4 pin plug covers starter motor and alternator
White is power for Injectors and Coils and addtional 12v power to the engine loom
2x Exhaust Gas Temp for Type K termocouples in the exhaust
51599366877_e33fc72658_c.jpg


I also added wiring for the Wideband sensor, luckily when I made the exhaust in 2018 I added a sensor bung after the collector for a wideband knowing I would probably need on in the future.
51601085350_1ea260a04f_c.jpg


Marked out a plate the same size as the factory ecu on some 2mm aluminium
51600192146_658dd429a4_c.jpg


Cut this out on the band saw and tidied up the edges to make a mounting plate for the ECU as well as functioning as a heat sink for the casing
51600850914_57795bc9b5_c.jpg


Finished the loom with some of the sections braided. I have not finished the main section of the wiring loom with anything as this will be inside the engine bay fuse box and just incase I need to change anything in the future it is easily accessed. I have added in the 6 pin braided wiring and connector for the wide band too.
51601082825_77c4c0e578_c.jpg


This is only a mock up but you can see that everything fits nicely inside the standard fuse box. Including USB for programming and vac line for the inbuilt MAP sensor
51599443952_54429fd165_c.jpg


I know that I should be right a max of the duty cycle of the injectors I am using with the M50 manifold so I've swapped to some Bosch items that are 580cc @ 3.5bar
51601085340_c6a81a17db_c.jpg


This meant a swap of injector plugs was needed and this section of wiring has always annoyed me due to how BMW laid out the wiring to fit in the standard injector tray the wires have always been a little short. I decided to cut of off and make a new injector section from scratch
51600407853_4ae48a9408_c.jpg


Braided and finished, so much tidier and better fitting
51600407463_8d5f880508_c.jpg


Final job today was to get everything back into the engine bay and fitted. It did take me all day to get to the point of having the car running properly but I am happy with progress made. I ran into two wiring issues, one being what was labeled as a ignition live which I used for one of the ECU powers wasn't in fact an ignition live it was a switched live from the main relay. I obviously need to power the ECU with ignition live prior to turning on the main relay, so I rejigged some of the wiring in one of the plugs and added a ignition live feed from the interior fuse box.
The second small issue was the radiator fan not functioning this was down to the PWM being voltage based for the fan control not PWM grounding as per the ECU so I changed the wiring in the engine bay and added a suitable relay to turn the fan on by the ECU
51600191921_b5911ba4f4_c.jpg


We made it this far. The car is calibrated and running on a base map I made myself from scratch, well I did have some similar engine maps from friends with similar set up's to look at for reference but I wanted to start off with my own base so I knew that each section was correctly set up for the car and calibrated properly as all sensors, throttle body etc require calibrating for the items used.
A little screen shot of the ECU Master black software, seems to be working well and quite user friendly.
Really good to see the CANBUS working correctly for the standard clocks as well as my logger screen on the dash. I will in the future start to modify the CANBUS steam with additional data
51600205666_afb702eeb5_c.jpg


Final things to get set up this week is the vanos. I currently still have the cams set at a fixed position so I am going to use this to set the cam angles before retiming the engine and plugging in the solenoids so I know what cam angle I should target to achieve the current fixed centrelines.
 
This blows my mind but fascinates me at the same time

Cheers, I’m glad you think so! This recent work has been really interesting, a good learning curve too. Taking on some things I’ve never done before really. I would have preferred to do it a little slower with more time but I have been determined to make Oulton in November.
 
Weekly round up.
Thursday evening was a early finish from work to try and get on with the car before it went dark, these darker nights aren't very good for working on the car unfortunately as well as the colder weather.
Now I have got the engine running on the new ECU with the cams timed up in their static position from the running in this measured at 107/126 centrelines I was able to read the cam trigger angle and create and offset in the ECU so that in their current position the cams read zero degrees so this is a known good target position for the cams.

With that done I started by stripping off the rocker cover
51629977651_a4f8b71fee_c.jpg


When the vanos unit it removed it is crucial to use the front timing plate on on the front of the engine to keep the vanos helical gears in the correct position, I used a DTI on top of piston 1 to set the engine to TDC as we found out the timing wheel mark and the pin on the flywheel wasn't 100% on TDC.
51630628369_9d95ca627c_c.jpg


I dropped on the 3d printed blocks to confirm the cam timing, Inlet 8 degree advanced, Exhaust 4 degree retarded which Is what I needed to get the 107/126 centrelines, despite the cams having a data sheet saying the should be 126 degree centreline they needed advancing to get them anywhere close, but weirdly I did find a small hand engraving on the cam that says 132... The plot thickens regarding these cams as I never bought them new but at least now I know a lot more about them.
51629977396_0a9f2f7f21_c.jpg


From here I decided to leave the exhaust cam in it's retarded position and run this as a fixed cam and set the inlet cam back to it's "stock" timing with standard BMW Timing Blocks. When starting the car and reading the cam timing from the scope it was showing an offset of -6 degrees which is close enough and proves the inlet car is over retarded in it's standard form.
I roughed in some values for the Vanos control with Min/Max/Stead Duty Cycle for the Vanos solenoid as well as setting up the target table for the inlet cam which can then be tuned properly on the dyno. I have taken the values from my previous map on MS43 and adjusted them to suit the new base cam angle.
51629179997_86627e8271_c.jpg


The ECU Master has a quite a nice logging feature built in when connected to the laptop. The screenshot shows the Cam 1 angle following the target and the duty cycle at the bottom controlling the vanos position. Really happy to have this set up and working for the moment.
51630656019_8d7c2284c3_c.jpg


The final job for the week was to make some changes to the exhaust, this is something which I've wanted to do for ages but never had the time of the motivation/need to get stuck in and do it, but getting this sorted before mapping was perfect timing.
I started off ordering a bunch of pre bent 2.5" exhaust tube with various flared ends, some single, some double with 45 and 30 degrees.
51629151367_2d45b95ac7_c.jpg


The main reason behind this is because when I first built the car I sent it to a local exhaust company and asked for a 2.5" exhaust making from the V Band on the manifold backwards. However when they did it the bending of the tubes was less than satisfactory but I was only running a standard engine then and it made good power 245bhp or there abouts on a standard engine.
Here's the offending bends with the reduced radius and the diameter of the pipe is considerably smaller on the bends
51630202238_3c1d353264_c.jpg


First job was to cut all the bends out of the current exhaust trying to retain as much of the straight pipe as possible, I mounted the exhaust sections back to the car and started to link them back together using the new bends and tack weld the piece together on the car
51630831290_ab8b7f8359_c.jpg


Once the full section was built up on the car I removed it and started to weld it together, it's been a few years since I've done any welding but It's good to get stuck in and do a bit, quite satisfying to built my own exhaust to a lot better quality than what I originally paid someone to do.
51630628394_f5d4a76f18_c.jpg


51629978016_78fca9e329_c.jpg


51630201638_d730fa78d4_c.jpg


That's it for photos from this week so far, I was due to be on the dyno yesterday but they have had to move the mapping session back to Thursday. In the mean time I have been setting up the CANBUS on the logger and the small data screen on the dash to show the temps from the ECU, really happy that at the moment everything is working as intended.
 
Thursday 28th October 2021 - Finally, I didn't think this was going to ever arrive, I couple of milestones reached for the E46. The first big on being to have the car running on stand alone ECU and the second was sorting out the engine issues issues which all resulted in building the new engine.

So after Mondays mapping session being cancelled I parked the car on the drive and waited for Thursday to roll around, nervously waiting to get it on the dyno and see what would happen. I wasn't expecting anymore gain in power but I was expecting to be able to get correct and accurate control of the cam timing, ignition and fueling. The ECU opens up a lot more options for the future too.

I didn't take any photos from the evening as I was more bothered about the car working correctly. but it probably looking something similar to this...

50138528807_5a7d0aa8b6_c.jpg


We started the session off with a chat about what I had already set up in the ECU, what needed calibrating and what I wanted from the ECU. Then mapping session went on for two hours, with only a few stops along the way for a chat about car set up. Chris started off with full load mapping to find the sweet spot for the inlet cam timing and moved it through the full range of travel across the RPM range, then started to work on some lighter throttle mapping but the engine was a little hesitant on initial throttle opening. We changed the ignition outputs to change the firing order of the engine and the problem was resolved and Chris carried on tuning, as a result much less fuel was needed on tip in and the ignition characteristics needed some tweeking, getting a little bit above my understanding but interesting to work through it.

After another 30 minutes tweaking the car sounded really crisp with the limiter set at just over 7000rpm we finished off with a couple of power runs just to check everything was still ok from the initial full load tuning. We tried a few additional degrees of timing and it was still picking up power to 270bhp but decided the timing required wasn't worth it so settled at....

Not necessarily the highest figures from the session as we did over 25 dyno runs but the last power ran gave. This is pretty much what I expected this engine combination to do and finished the evening with a big smile on my face knowing all the effort was worth it.
51635079757_62de329f60_c.jpg


I often get asked, normally by PM's rather than posts on forums about how things compare vs one another so I've scanned in some graphs and put some over lays together to give some comparisons of what I've learnt along the way.

Starting from the beginning.
2018 - Standard M54 Engine with S50 Manifolds
44065319105_52dc8c0428_c.jpg


2019 - I fitted an M50 inlet manfiold and did back to back comparisons
M50 helped out in the mid range...But I stuck with it for simplicity sake as it's a much simpler manifold
48994706463_bbcf22d8d7_c.jpg


2020 - Saw the building of the new engine with Schrick Cams
On the running in/Dyno day I had a failed exhaust cam sensor which meant no Variable valve timing but it made reasonable top end power
50134878982_bdb0015f6a_c.jpg


Same graph as above but compared against the standard Dyno plot from 2019, only really shows the difference the cams make at the top end as not VVT.
50134861541_9c4599d9bd_c.jpg


March 2021 - I went back to EFI as I wanted to try and M54 manifold on the new engine with Cams.
I expected this to be a good evening potentially making more top end power with good bottom end torque, weirdly I seemed to have lost 10bhp generally across the rev range but peak power still strong.
51071893826_368d37c718_c.jpg


April 2021 - For comparisons sake I popped back with the M50 refitted just to see if it was the manifold or the engine.
I found that yep the figures were down, something wasn't 100% happy. The background being a comparison against a dyno run from 2018 on a standard engine, cams make a clear difference above 5000rpm though!
51168311303_b1ac8a5d2e_c.jpg


I continued to use the car through the summer of 2021 - Cadwell, Snetterton no issues at all and the car performed really well, I did mess with the exhaust cam timing but never got to test it on the dyno but It pulled well and managed to keep up with some faster cars so who really knows what the power was doing but the engine was rebuilt.

Oct 2021 - New engine
This graph shows the effect of the Vanos advancing the inlet cam through the mid range in black vs a fixed cam position in red. Make a massive difference in mid range torque, this is one reason I was very keen to get onto stand alone ECU so the cam timing being full variable over a 20 cam degree range could be dialed in perfectly.
51635909861_ddaf098b55_c.jpg


Final comparison
Blue - New Engine Oct 2021
268bhp/258ftlbs
Bold Red and Black - March 2021 (Same engine set up as current on standard ECU with standard cam timing)
253bhp/255ftlbs
Faint Red and Black - 2018 - Standard Engine with S50 exhaust manifolds
240bhp/242ftlbs

51639995475_89c5ed385d_c.jpg


Finally...
Oulton 13th November, it looks like the car is going to get there anyway, it will be a test for the new set up and no doubt that'll give me something to talk about after it.
 
Oulton Park Prep.

Leading up to Oulton there was a few last minute jobs to get boxed off, I wanted to make sure I had done everything I could think of prior to the track day.

Throughout the year I've had an annoying number of vibrations through the car under braking, one of them was from the front end when the polybush was working it's way out which I sorted after Cadwell with the new solid mounted wish bones on the front. The second was through the drive line which was more apparent when the car had more rear end grip as I was shifting the brake bias towards the rear and increasing braking force.
I did a couple of measurements of the rear discs and hubs, back left had a little bit of run out so decided to do some maintenance, I replaced the hub on the rear left
51683292899_97cdc53776_c.jpg


To be sure everything was perfect on the rear I also swapped the rear discs for new ones.
51682882063_d8516e6689_c.jpg


Nice and fresh hopefully no braking vibrations to be found at Oulton.
51683292694_ac1a45a531_c.jpg


Picked up some spares for the track day box. A spare fuel pump, I also carry a spare in tank pump in the track day box.
15L of Shell oil. I did a oil change after running the engine in and mapping on Millers running in oil. The car takes a total of 8L now.
51681827182_e764e240c2_c.jpg


Friday night before the track day I gave the car a quick wash, I hadn't touched it since Snetterton so it was due a good clean, No splitter fitted for Oulton so we'll see how it drives.
51681826932_9906053059_c.jpg


Arrived at the circuit at 7:30 and fitted the wet tyres to the car, It has rained until the early hours of the morning leaving the track wet for sighting laps and a few mornings sessions.
Nervously went out to complete sighting laps in the car totally unknown what it was going to be like since the rebuild, the only confidence inspiring bit was the engine had already done 3 hours on the dyno.
I left the car to idle and get up to temperature saw in the garage be doing out for sighting laps, Car felt good on sighting laps despite cruising around at slow speeds, I have set up engine protection on the new ECU with very low rev limiters for oil and coolant temps both high and low.
Noise tested the car and it was in the high 90's, 98-99db, not too bad!

I got a couple of sessions under my belt but as I started to build up some speed on the rainsports I could feel a little bit of vibration through the foot plate on left hand corners. I cut my second session short and headed back to the pits. Jacked the car up and did a bolt check of the front end, I expected to find a bolt loose on the wishbone or the new lolly pop bushes, turns out I could get some movement on the wheel, strange as I had only checked it when I did the rear wheels the week before.

Caught in the action, I pulled off the caliper, disc and wheel bearing, I should add this wheel bearing was replaced when the car was built 3 years ago so not too bad. It's the front left that has had a couple of failures.
I do carry a spare wheel bearing so I grabbed that from the van and set about replacing it, also pulled the angle grinder out of the van to split the old inner race before fitting the new bearing and swapping over the wheel studs into the new hub.

51682880788_63d4a76309_c.jpg


51682882723_f865a9c52e_c.jpg


I decided it was a good time to get the wheels swapped to the AR1's as a quick look at the pit straight was showing some drying patches
51682623156_82fe10d5b6_c.jpg


Out I went for a couple of sessions on the drying track.

Video from before lunch catching up a BMW M2 and E46 M3

51683291174_dd17798c7f_c.jpg


As the day was a MSV day I asked a friend who does a little bit of photography if he wanted to pop down and take some photos. MSV unlike any other TDO's charge for their photos from their days and typically aren't good quality.
51681939152_11807ddd4f_c.jpg


51682733301_eaeb23c722_c.jpg


51681938782_47872e3179_c.jpg


Lunch time came around, I checked the logs from the car, everything was looking good so far. I made some small changed to the logger to get a proper wheel speed reading, checked the cameras were recording the antics from the morning, nervously checked the oil level to find a full dip stick, this was a relief! Finally I put 20L of fuel in ready for the afternoon.

After lunch I got out with Chris in his E36 Turbo. This turned out to be a great session with some nice clear afternoon laps.
I had been aiming to do a 2:00 minute lap around Oulton with the previous best lap being a 2:03 if I remember correctly from Oulton in 2020 from a drying circuit.
I don't have any lap timing in the car and the lap times are purely taken from the GPS data at the end of the day so I was really pleased to see a couple of 1:58 laps with a couple of laps of 1:59 with a passenger as ballast! Really happy.

Video Link

Quiet afternoon lapping as the sun was setting
51681939472_959bcecc49_c.jpg


51683404729_e079a01b37_c.jpg


I ran the car pretty much right up to the flag, I brought the car in a 3:45. Really happy with the performance of the car, handling feels really good, feeling really confident on the brakes, the car was really confidence inspiring, little bit of understeer on some of the faster corners, this could be possibly down to the lack of front splitter on this day. It will be back after some maintenance over winter.
I had spent a lot of weekends and late nights working on the car leading up to this track day. At some points I was ready to leave it, cancel the day and finish the rebuilding over winter but the car working so well at Oulton made all the effort worthwhile! Finished the day with a big grin! This track day was also booked by roughtly 12-14 other friends I know through track days which also made it a great social event, always great to see so many people at Oulton at the end of the year. Really did finish on a high!

Sunday morning, the down to earth side of track days, is always at least half a day, sorting out the van, car and trailer.
Unloaded it early in the morning still covered in in dew from the cold morning
51683291944_d77774c1ec_c.jpg


Wet wheels getting a wash. Still running staggered 225/255 Rainsports on MV1's
51683513240_8690fe0041_c.jpg


AR1's - 255 square set up on TD's 1.2
51682623486_c271663707_c.jpg


I have been asked a few times how the AR1's are holding up. These have done 4.5 days on circuit now. Holding up better than I thought on the wear front, I have only rotated them once after 2 days from side to side, running 29-30psi in them, seems to be giving a good balance of grip, feel and tyre wear.
51683513125_0bf4d20297_c.jpg


51683293149_1e0372a2f4_c.jpg


That brings this years trackdays to a close. It's been a great year with some great UK trips away in the car.
I have a few things planned for winter but I'll see what people think before I start discussing those and no doubt documenting the process along the way.

Where do we go next? What do we change?
 
Great work Tom, so glad the engine is holding up but I know that paranoia will be there for a good more few days.
Loved the lap of you and Chris, at like 45secs when he nearly rear ends you, bet you didn't notice is as much at time but in playback laughed haha.

Do you think brakes like a BBK are on the cards?
 
Cracking write up as ever Thomas. Them AR1’s holding up really well. Did you swap front to back or side to side or both? That’s my next move