You are using an out of date browser. It may not display this or other websites correctly.
You should upgrade or use an alternative browser.
You should upgrade or use an alternative browser.
HELP! Fuel Flap Stuck!
- Thread starter johnrellis
- Start date
Just went through the one tank, was doing about 10 mpg 
Yeah, it is a pretty small space you my need to go up through the wheel arch but I have never taken it off, I almost went that route when trying to figure out how to open it the first time.
Might be worth trying to find a maintenance manual on ebay, or if anyone on here has it, could they take a look??? Might be worth starting as new thread?
Thanks for keeping us informed
I also posted on the Cliosport forum and one response was:
Simple job this - Remove the trim panel or, if you're brave bend it out the way enough to get your hand in. Then disconnect the multiplug before removing the clip that hold the motor assembly in place. After that you just wiggle it about and lift it clear.
I have also found out the part is £45 inc vat and is the same in the 197 as the standard clio. My local breaker has a couple of clios in there so I'm going to go there on Monday and get one. This will also give me a chance to practice
Sweet man, no soldering involved! Looks like a job even I could do
Hmm wonder can I get a part that cheap in RIP OFF IRELAND.... ahem
Hmm wonder can I get a part that cheap in RIP OFF IRELAND.... ahem
Well I finally went to the breakers yard today and of the two mk3 clios they had, one had no rear end damage so I removed the motor and paid £10 instead of £45 inc vat from Renault. I also had an opportunity to learn how to dismantle a clio without caring what I did to it and you can’t put a price on that knowledge or the fun I had learning. I had already checked with Renault that the part was universal for all mk3 clios. The main difference is that as the 197/200 is a wide body, it makes the job a lot harder as the motor is recessed into the inside of the rear wing.
So how to do it? Firstly, if you look at the photos earlier in this thread, you can see that the inner white panel inside the car has been detached at the tailgate end and pulled back to make a gap to put your hand in. This is all you need to do to get access to the motor. There is no need to remove the panel completely and when practicing at the breakers (I did remove the entire white inner panel) I broke some of the clips. Most of this job you do by feel. This is the order to remove/replace the motor:
1) You need to pull out the white pin on the left side of the motor. I did this by having one hand in the gap on the pin and levering it out with a long flat head screwdriver. You should be able to see the white pin through the gap.
2) Once the pin is released, start to pull the motor out by pulling the unit at the left hand side where the pin is. The right hand side has a black guide that is parallel with the pin and in a recess. Once the motor is free on the left hand side, the rest is easy.
3) Pull the motor a couple of inches out of the recess and this will now give you access to detach the power connector. You have to pull the motor out first as the retaining clip that holds the power connector in place is on the back. Once the power connector is removed you can now pull the top of the motor out and then lift the motor upwards out of the recess. There is a 6 inch rod at the bottom so you will need to lift the motor out of the car.
4) With the motor removed, put your hand in the recess and feel along the bottom. You will feel a small hole on the right hand side. This is the hole that the pin must go into before you can push the motor back into the recess.
5) With the motor back in place, reconnect the power connector before fully pushing the motor back into the recess.
6) This is the most annoying bit. Making sure that you have the white pin pulled out, you need to ensure that the black guide is in the hole on the right hand side before you push the motor fully back into position.
7) With the motor back in place, push the white pin in to lock.
The entire job took me about 15 mins and a little bit of skin!!!!!!
I can post a picture of the motor if anyone wants but you shouldn't need it as once you have the replacement part in hand, it becomes obvious.
Last edited:
Just to contribute my experience of a failed fuel flap filler release mechanism on the Clio III. Thanks to earlier posters for the guidance.
Dealer offers new part for £45 and £100 for part fitted (all inc. VAT). Used ones sometimes available from ebay for circa £20.
Renault part number 8200312600. One seller suggests same part is used on Modus
Access
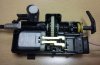
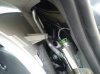
Picture shows inside the mechanism. On mine the electrical motor had failed. Measured open circuit across the two connections. The black paint on the metal crimp fit fastener (circled in picture) for the locking rod extension was worn away in a line. Also the plastic collar that the rod fits through in the bodywork cavity felt to have a small piece of the neck missing. The metal crimp has a slightly raised lip where it fits on the plastic rod. Speculate that the lip of the crimp could have snagged on the collar and caused the motor to jam an burn out the motor bushes/commutator.
The mechanism has no limit sensors so not sure how the ECU knows when to turn off the motor drive. Possibly just time based signal or current measurement of drive signal?
Dealer offers new part for £45 and £100 for part fitted (all inc. VAT). Used ones sometimes available from ebay for circa £20.
Renault part number 8200312600. One seller suggests same part is used on Modus
Access
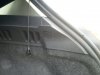
- Prize the squarish shaped clip out of plastic parcel shelf support moulding (picture).
- Fold back rubber tail gate gasket in area of trim that rear seat belt comes through.
- Carefully prize open this trim which is held in place with three flaps. These are slightly flexible and not so rigid that they will snap with small movement - but be gentle.
- Prize the trim at the top to pop out the concealed top fastener.
- This gives enough access to remove and replace the part but it might make it easier to more fully remove this piece of trim.
- The mechanism is held in place with a white plastic fastener and and a stepped tab which fits in a square aperture in the body work. (Not sure what the threaded piece or adjacent sprung barb are for)
- The white fastener is semi-captive. Be careful when prizing the fastener out as if using a flat bladed screw driver it's easy for it to fly out and drop down the cavity in the body work and then you'll have a big job trying to get it back. Bare this in mind if you're fitting a second hand replacement which might not have the original fastener.
- Once fastener is removed just angle the LHS of the mechanism away from bodywork to disengage the tab on the RHS.
- Remove electrical connection. Has a retention tab which will snap if bent back too far.
- Lift mechanism up such that the rod that locks the flap is pulled out through its hole and collar.
- Remove the mechanism. This together with getting the replacement back in position is the trickiest part of the job. There is the rear headlight light cluster wiring loom and another cable and/or hose passing in front.
- Before refitting familiarise yourself blindly with the collar that the locking rod goes through to the fuel cap area, the round body work aperture that the white fastener fits in and the square aperture that the tab fit in.
- Ensure the white fastener is captive, but not fully pushed home before fitting.
- Lift the locking rod as far up the mechanism as it will go.
- I found it easiest to offer the mechanism the wrong way, i.e. with rod at the bottom but white fastener facing away, and pass it between then up through the two cables/hoses.
- Put the rod through the collar then once home rotate the mechanism the correct way - if that’s how you did it.
- Fit electrical connector.
- Locate tab into the square aperture.
- Adjust position of the mechanism slightly until you feel each half of the snap fit connector the white fastener goes in is in the correct position.
- Push the snap fit fingers of the mechanism in to the body work aperture my pressing on the mechanism body and not the white button fastener. If you press in the white fastener before the mechanism is correctly snapped in place then you will probably have to remove the mechanism to release the white fastener.
- Push home the white fastener to lock the mechanism is in place.
- Test.
- Refit all trim.
Picture shows inside the mechanism. On mine the electrical motor had failed. Measured open circuit across the two connections. The black paint on the metal crimp fit fastener (circled in picture) for the locking rod extension was worn away in a line. Also the plastic collar that the rod fits through in the bodywork cavity felt to have a small piece of the neck missing. The metal crimp has a slightly raised lip where it fits on the plastic rod. Speculate that the lip of the crimp could have snagged on the collar and caused the motor to jam an burn out the motor bushes/commutator.
The mechanism has no limit sensors so not sure how the ECU knows when to turn off the motor drive. Possibly just time based signal or current measurement of drive signal?
Attachments
Last edited:
this happend to me in a petrol station, the lock siezed in mine so i had to slide the main cover off towards the back and get my finger in and push the locking pin up to release it so i could fill up, i felt like a right tool doing it
Ugh, it looks like the solenoid is gone, not looking forward to pricing a new one. I got it open in the end thanks to a cached google post. Basically there's no easy access release, you need to take off the interior panel that the right rear seat belt feeds through. it is the white one and comes off easily.
the text is below, I will attach some pics too.
"This happened to our 55 plate clio this weekend. And I felt compelled to join this forum to post a bit of useful/accurate "how to" information.
On our model, it a regular bog standard clio, there is no emergency release pulley or clip despite what the previous posts say. I phoned the renault dealership that sold us the car and they confirmed this.
It is possible however, as I discovered eventually, to squeeze ones hand onto a tiny element of the central locking solenoid that locks the fuel tank door if you unclip the trim around the rear A frame where the fuel door is situated.
On our clio (with the trim removed) we seem to have an airbag unit just the above the seat belt unit. To the right and very slightly up from the airbag gas canister it is possible to get ones hand in to a small gap (this will be directly above the fuel door. Here you can feel what seems to be the top of a small piston or plunger. This is the lock device for the fuel door which you can pull up. This should "manually release the fuel door and you can fill up and then sort the route cause of the problem.
DO NOT attempt to tear off the door, there is no way for it to come off without causing major damage despite what you may think.
Hope this helps
Vaz"
thank you for such a detailed description and for the pics!
the same shame happened with me on Sunday at the petrol station in Budapest/Hungary!
I was so pissed off, tried to solve it, but at the station I was able to peel back the carpet but found only the seat-belt fittings...
luckily had enough petrol in the tank so was able to drive back home!
but now having all this info in hand I will go home and open it by myself
and its a very good info to buy a "used-one" as its standard on all mk3 Clios, so I will take a look and do that!
Thanks again johnrellis and Marv and Foxspeed to share these info!
cheers Tamas
Fuel cap stuck on Renault Clio Mk III (05 onwards)
This mechanism is a piece of crap - and so is the way the body is put together, thus it's easy to get to the locking mechanism in an emergency:
1. There is NO pull ring mechanism in the inner trim or behind the parcel shelf.
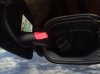
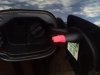
2. The Outer door trim on the fuel cap is only held in place by 5 or 6 plastic slides. Pull panel gently towards you and slide it from RIGHT to LEFT (towards back of car). It should move without too much force.
3. You can now see the locking pin at the top of the inner fuel door. Use something long and thin to move it UP.
4. Put the trim back on ... it'll clip into place.
Sorted ... at least until the next time
This mechanism is a piece of crap - and so is the way the body is put together, thus it's easy to get to the locking mechanism in an emergency:
1. There is NO pull ring mechanism in the inner trim or behind the parcel shelf.
2. The Outer door trim on the fuel cap is only held in place by 5 or 6 plastic slides. Pull panel gently towards you and slide it from RIGHT to LEFT (towards back of car). It should move without too much force.
3. You can now see the locking pin at the top of the inner fuel door. Use something long and thin to move it UP.
4. Put the trim back on ... it'll clip into place.
Sorted
... at least until the next timevery helpful post - thanks to all that have contributed.
on my clio, i managed to find a black box that has the manual override on just behind the motor. if you then left push this up, you can open the flap. Clearly only a temporary fix but at least I can fill my car up as I had nothing left!
I'll need some more light to try to replace the part and also need to find the part as well! anyway, thanks again
Hi,
Not sure how old this post is but thought I'd chip in to say we had the same problem on my wife's 06 plate clio 3 fixed by main dealer in Worcester £45 part & £36 labour a 30min job for them.
Very lazy I know but not the horror story I expected it to be & thought it would give a guide for anyone else as mechanically inept as me!
I too came into trouble with this and with the help managed to open it following the instructions found.
I then removed the mechanism and dismantled it and got the code from the motor inside it and as there was no wear to the rest of the mechanism I just replaced the motor to effectively make the motor as good as new like one costing £45 would be but only spent £9 on the motor (pictured below) the code being FC-280ST-18180 which is slightly different from the code on the original but is the same spec
Here is the eBay link if anyone wishes to do as I did in the future http://www.ebay.co.uk/itm/140649032904?_trksid=p2060778.m2749.l2649&ssPageName=STRK:MEBIDX:IT
disconnected the solenoid who goes round checking fuel caps really? plus never has any fuel in it anyway ha
Had this happen to me while i was im a rush to meet a mate, always happens when your in a rush! Ive just disconnected the solinoid for the time being as my car lives in a garage 90% of the time total pain to get to on the bp gargae forcourt. Any chance one of the mods could stick the correct solution as the first post, (as listed on page 4) so that people in a hurry dont waste ages looking for a non existant emergancy ring pull like page one suggests? All while looking a right tit!

I have the same issue - got caught and wasn't able to fill up!
In my case the lock did lift 1 out of 20 times so I did get it unlocked at home.
I then blocked the lock hole with a bit of gaffer tape, if someone is desperate enough to syphen fuel one day, I will replace the motor with a scrap one. Until then tape is the answer!

In my case the lock did lift 1 out of 20 times so I did get it unlocked at home.
I then blocked the lock hole with a bit of gaffer tape, if someone is desperate enough to syphen fuel one day, I will replace the motor with a scrap one. Until then tape is the answer!