All work is courtesy of Jay at MigliorDetailing.co.uk
Anyway, the full write up has finally landed, big thanks to Jay and, enjoy -
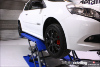
Here we're looking at the very capable Renault Sport Clio 200. This has been rated as one of the best front wheel drive hot hatches going.
The car is a matter of months old, but it was already showing some swirling. The dealers charged my customer for their diamondbrite sealant, this costs about £400 and for that, you get next to no protection. Actually, what am I being kind for? There was no evidence of protection whatsoever. Aside from that, included in the price is, buffer trails, swirl marks and a lot of marring.
Summary of the work carried out:
- Perform enhancement detail to remove buffer trails/dull looking paint
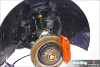
- Full wheel & Arch Detail
- Swap grey centre caps with black ones
- Protect the car for the winter.
Obviously, the car has been used for a few months, but you would expect some form of protection on the car even after a few months. With the car holding on to water and how dirt had stuck to the car, it’s fair to say the dealer applied sealant is of no benefit in any terms.
Here is the car on arrival.


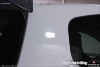
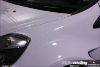
You can see how the dull the paint looks. This looks to be hologram marks left by the dealer or whoever carried out the diamondbrite application.


Black wheels, silver centre caps. Well done Renault!

So, on with the wash & clean down. It was dark outside at this point, working late again!

Wheels dwelling in acid free wheel cleaner. Once the wheels were done, I rinsed the arches and sprayed them with degreaser.
Door shuts cleaned with citrus degreaser and agitated with Swissvax brush

Looking much cleaner


Same again on the other side


Now the car was foamed and rinsed off

The "ultimate" in paint and fabric protection............... it made me chuckle!

Once the car was washed, it was treated to Tardis to remove some of the tar spots, and iron cut to remove some iron filings. The car was rinsed with the pressure washer then brought into the unit wet, for claying.
There were still some iron filings which were not completely removed by the iron cut or IronX as it is no known. These must have been pretty deep seated in the paintwork

Anyway, they were removed in the claying stages


Then the car was dried


continued...
Anyway, the full write up has finally landed, big thanks to Jay and, enjoy -
Here we're looking at the very capable Renault Sport Clio 200. This has been rated as one of the best front wheel drive hot hatches going.
The car is a matter of months old, but it was already showing some swirling. The dealers charged my customer for their diamondbrite sealant, this costs about £400 and for that, you get next to no protection. Actually, what am I being kind for? There was no evidence of protection whatsoever. Aside from that, included in the price is, buffer trails, swirl marks and a lot of marring.
Summary of the work carried out:
- Perform enhancement detail to remove buffer trails/dull looking paint
- Full wheel & Arch Detail
- Swap grey centre caps with black ones
- Protect the car for the winter.
Obviously, the car has been used for a few months, but you would expect some form of protection on the car even after a few months. With the car holding on to water and how dirt had stuck to the car, it’s fair to say the dealer applied sealant is of no benefit in any terms.
Here is the car on arrival.
You can see how the dull the paint looks. This looks to be hologram marks left by the dealer or whoever carried out the diamondbrite application.
Black wheels, silver centre caps. Well done Renault!
So, on with the wash & clean down. It was dark outside at this point, working late again!
Wheels dwelling in acid free wheel cleaner. Once the wheels were done, I rinsed the arches and sprayed them with degreaser.
Door shuts cleaned with citrus degreaser and agitated with Swissvax brush
Looking much cleaner
Same again on the other side
Now the car was foamed and rinsed off
The "ultimate" in paint and fabric protection............... it made me chuckle!
Once the car was washed, it was treated to Tardis to remove some of the tar spots, and iron cut to remove some iron filings. The car was rinsed with the pressure washer then brought into the unit wet, for claying.
There were still some iron filings which were not completely removed by the iron cut or IronX as it is no known. These must have been pretty deep seated in the paintwork
Anyway, they were removed in the claying stages
Then the car was dried
continued...


 )
)