750MC - 200 Beginner Build

MoleRacer

Paid Member
Hi there team Clio

I started a build last year that is very slow and painstaking due to having three very small children who keep interrupting, such a nuisance.

Aim of the game is for the car to be eligible in the 750mc clio championship, but also to race the car in longer form races as I’ve gotten used to doing 45 min races in trackday trophy.

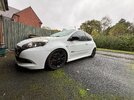
So I bought a Glacier White Clio 200 and took spanners and trim tools to it!

IMG_2897.jpeg
I have a fair bit of experience working with cars, but this is usually on the build side, not the unbuild side! And it’s all on the body rather than the oily and sparky bits. So that’s trials and tribulations for later, at least the strip down was relatively painless

IMG_3108.jpeg

With the car stripped I set about buying stuff. I decided on doing the hardest part first, and after one phonecall with my nephew to decide the colour of it, the roll cage was on the way.
That arrived in December and it’s still not fully in! But that’s the curse of small children I suppose. And it doesn’t mean that I haven’t been doing a bunch of other jobs to keep it ticking over in the mean time.

Very simple stuff. Bonnet and boot pins are fitted. Each pin was installed neater than the previous one as I got more experience!

Steering wheel was harder to pick than it was to fit!

But i keep coming back to the cage. Not having it fitted was really making me feel progress isn’t quick enough.

I’ll keep popping updates on here and hopefully will get something racing before the end of the season!
 
Some time has passed and I’ve finally got a roll cage in the car! Took my time doing it but I wanted to get it right. IMG_4587.jpeg

Total faff of a job. And anyone considering doing it themselves I highly recommend paying a man who does it regularly. I am glad I’ve done it.m, bucket list tick, but I doubt I’ll be repeating it anytime soon!

Next jobs on the list are to get the extinguisher plumbed in. Seatbelt mounts fitted. And get the seat in place.
Oh. And it’s been sat too long and doesn’t start anymore, so a new battery and I hope to god that fixes the problem because oily bits are where I start to lose the will to live.
 
Having taken Grinchlys comment too seriously, I got a wiggle on and fitted the seat. IMG_4719.jpeg

I also needed to get the headlight adjuster switch panel back into the dash, but had cut away the retention for it where the cage goes through. It also got in the way of the TC button.
So I switched the button for a blank, cut the end off, and secured it through the dash - before covering the offending self tapping screw with a bit of dash trim!IMG_4729.jpeg

Next step is to get the car running because my battery is flat as a pancake. Then I’ll finally fit the isolator once I know that I haven’t messed up something on the electrical side!
 
Good news. After a summer of doing nothing due to holidays and being run around the house by my small children, I finally got a new battery and the car does work! So I haven’t killed it which is a massive relief. Especially as one of my helpful friends went through the cabin harness with an angle grinder…

I did get around to fitting wheel studs at least.

I have decided, for the sake of simplicity, to keep the battery where it is, for now, but did go for a lightweight one at least. So big cables through the bulkhead and into the centre console for the isolator. And it’s earthed through the resistor. But I cannot find a decent wire to cut for the ignition. And I need help.

Can anyone recommend somewhere to find a decent wiring diagram that will help me identify the wiring to the ignition coils?
 
  • Like
Reactions: RSRowe
You want to find the live wire between the fuse box (260) in the centre of dash and the ignition/starter switch (104), the ignition is 104 in this diagram and the fuse is F16, by cutting/disconnecting that wire you would stop the car in the same way as pulling the key.

Screenshot 2023-09-06 at 06.38.26.png

Screenshot 2023-09-06 at 06.39.15.png
 
Is this the same with a key card then?
Because this makes sense. But I still can’t fathom it out, especially given that I wasn’t aware of the fuse box in the centre of the dash - unless you mean the one next to the steering wheel?
 
Is this the same with a key card then?
Because this makes sense. But I still can’t fathom it out, especially given that I wasn’t aware of the fuse box in the centre of the dash - unless you mean the one next to the steering wheel?

Ah no this is with a key, I believe its a lot more complicated with the key card...
 
I’ve managed to sort the isolator out. It’s not pretty but it works.
I’ve basically run another wire through the bulkhead into the engine bay fusebox where I’ve piggy backed into the F20 fuse that controls the ignition coils. Had to do some faffing to get everything to sit nice but the key is that it works!!

Hot off the heels of that, I’ve plonked a blanking plate over the radio hole for the switch to live in, and I also wired up my fia rain light. As you have to render the integral fog lamps inoperable, I’ve tapped into the fog lamp cable and used that to power the light - meaning that I won’t have to add any switches to the car.

I do need to sort the horn out though. Having annihilated the clock spring when swapping the steering wheel over
 
Latest Update - things are moving the right way.

I’ve been messing around with the electrics trying to be clever in order to fit a horn button in the dash, having lost the steering wheel function. And during this…exploration of the wiring, I cocked up the steering column. Meaning that the car wasn’t receiving the signal to change whatever setting they were on when i messed up whatever I messed up.

But I did at least install a working horn button.

So after mullering a cable whilst trying to repair it until it was beyond repair, I arrived at the realisation that I needed to take a pin out of a connector and fix it at the source. This was sad times.

So I bought a new, pre wired connector instead and set about wiring that into the loom, and once completed, i very proudly discovered that I had made no difference whatsoever. So I took the original connector, and then repinned it. Something I did not think I would ever do being a body structures engineer! To my great delight and surprise this worked. And the horn didn’t anymore.
But then some exciting things were delivered, my suspension arrived, and so the horn can wait. And so begins my learning of how to do suspensions.

And it started with a discovery of previous owner bodgery. The front right strut had 2x13mm AF bolts, and the third was either so chewed up that it was only 11mm, or it was in fact, 11mm. And very much seized beyond belief.

So I set to work doing all manner of things in the wrong order, undoing a redoing things to get things work the way I wanted. But the main thing to note is the pinch bolt that holds the bottom of the damper is a total arse. Nut and bolt scenario. And a big ol breaker bar can get them moving, but the bolt just won’t move without additional help. It will rotate, but because the hub casting isn’t threaded, it just spins. Which had us thinking that the only way out was to remove the entire hub.

Well, on the rhs I managed to get it out by holding the nut still with one socket, whilst undoing the bolt with another, this got it moved enough to press it out using a ball joint tool. Wasn’t ideal, but it’s what I did. And I hammered out the last bit.

LHS was just in there forever, and the same technique was not working. So after many swear words, I cut the end off so that I could for the ball joint tool on it, and then I finally got some success!

With that bolt removed, and the drop link disconnected, the hub pivots out just enough to get the stock shock out, although some persuasion was required to get the hub low enough for this.

With that arse out of the car, fitting the new ones was actually pretty straight forwards, I’ve ordered and fitted new pinch bolts given the state of the ones I removed, with a liberal coating of copper grease should they need to be removed!!

DC (of the cabin wiring/angle grinder fame) attended to the rear on his own the day before this whilst me and Tom failed at the front end. He was most pleased with himself. What he didn’t spot though, was that the LHS spring touches the wheel arch panel. This is something I might have been aware that could happen. But it slipped my mind to mention it during the work. And so some hammering has had to happen as that seems to be the accepted remedy to this situation.

But eventually. I have a new suspension. And I’m proud as punch.

I came back around to the horn after this. And gave up with the original plug (I say original but it’s a bit like triggers broom at this point). I got a new plug and just wired it all in and made the horn work. Made a little switch location for it that I can reach from the wheel and job was done.

IMG_6031.jpeg

New brake discs and some pbs pro race pads fitted all around makes me almost MOT ready. Or is it?
 

Attachments

  • IMG_6030.jpeg
    IMG_6030.jpeg
    4.1 MB · Views: 6
It is sometimes easier to take out the entire front suspension strut with the hub still attached to separate the shock from the damper, particularly if it is hel together with crusty bits and bolts.