Tom's Track Car - BMW E46 -Engine Number 3

dodgy story about our local bmw dealer, took my bosses old m3 e46 in for a check of the rear subframe mounts, claimed theyd done the work and welded them up properly, now being mechanics we had to have a look, so we poked a endoscope through the seatbelt bolt holes under the rear seat, and who'd have thought it... no weld showing, no discolouration of the paint, not any evidence of welding, which for a warranty job we were quite surprised... quick message to an acquaintance you may have heard of... Adam Raynor, motoring journo, who happened to have the german bmw guy who was in charge of bmw uk's account and pr, funnily enough his car was taken to a different dealers and then actually welded up properly not just flicked over and hidden without a repair
 
wish i had as much knowledge as you Tom..hats of to you as always..
4mm clearance??is that enough??

Yeah should plenty that, couple of mm is enough clearance there. Will only get closer if I lower the car but I doubt I'm going to go any lower then where I've guessed the dampers needs to be set, if anything I think I'll need to go higher.

Wish I had half the knowledge lol. Great build thread Tom. Really enjoy reading it

Thanks again. I've only learnt everything I know about cars through doing, it's all self taught by doing it myself, taking things apart of reading about the topics before doing things. It's only nuts and bolts really with the odd problem solving task too. Best way to learn is to get stuck in. That's all I did when I was at in High school with bikes and things progressed from there.
 
Been very short of time over the past week or so, only just finding time to log onto here and update with a little bit of progress.

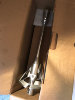
Started off with the Parcel from Europe I had been waiting 8 weeks for, it was certainly worth the wait though. RTD Tall Race shifters with a custom Duel Sheer linkage. They don't normally make them for the 330i but pointless spending so much on a shifter to mount it to the box with an old crappy linkage...
42800320114_65c9666118_b.jpg
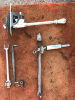
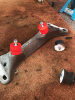
Out with the old... In with the new, taken the usual theme here and replaced as much as possible. also replaced the push rod on the end of the gearbox and the linkage pins too.
29646080858_c6ab5852b4_b.jpg

43517235851_c78553db28_b.jpg

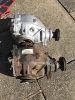
Polybush gearbox mounts fitted up too. All Poly mounts on the suspension and Engine are 90 Sha rating which are the hardest you can buy the polybush mounts in.

29646080238_66e53f2310_b.jpg

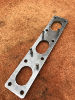
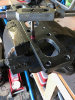
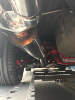
The flange adaptor plates I designed come back from being laser cut, I just needed to do some final bits to them, the Exhaust studs are M7x1, just had to thread them all the way through and grind the studs to the right length so they didn't come through the other side of the adaptor

29750646948_c76e29c4a4_b.jpg

One done, just the other one to go then they can be bolted to the manfiolds then onto the engine.

29750650708_1d9649ed62_b.jpg

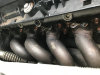
What a job that was! Took a couple of hours to get the adaptors bolted to the flanges, then the whole lot bolted to the head. All new Genuine BMW studs and Copper Nuts used.

41812238260_4973bd4cde_b.jpg

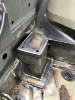
Another bit mark post achieved, was finishing off welding in all of the plates for the cage, strut braces and eyelets for harnesses, this took a good 4 hours welding, really neatly done with all little plates used to fill the gaps between the cage plates and the floor.

41812239950_6978257a3e_b.jpg

28733050027_88a2080970_b.jpg

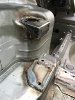
With that done the car went off for an Exhaust made from the manifold back. I'd already fitted a V Band to the manifold before it was fitted to the car. Great bit of Engineering, no silly sleeve joints, no exhaust pastes of gaskets.
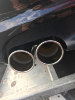
Exhaust fitted with two longer straight through absorption silencers with a straight section in the middle where another box can be added if required. At the moment it's loud!

41812234940_8a50647fe8_b.jpg

Nice twin outward rolled exhaust tips to compliment the full 2.5 stainless system. Will get a better photo of under the car when it goes for alignment.

42716727885_380a93b56d_b.jpg

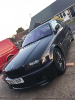
Cleaned and sat on it's wheels properly to give a good idea of the ride height, nice to give it a good wash to remove all the dust that's gathered on it over the last few months.

41709090720_2c9afa1c2b_b.jpg

Had a few little gremlins this week with the electrics which a few people I've spoken to know about, but it's all sorted now after a few long nights fault finding when it refused to start when all the wiring was plugged back in. The main relay wasn't being powered by the ECU which meant there was no power to injectors, coils or fuel pump. In the end, all earths checked, wiring and fuses but still no luck.
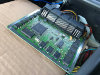
In the end I thought I was an Immobiliser problem so cracked open the ECU. Completed flashed new software version onto the ECU with a few tweeks like Immo delete to see if it fixed the issue. No change.
Sourced a spare ECU from 5 miles away and tried that still no change.
After a few hours Tuesday evening fault finding the tracing wires the culprit plug on the ECU wiring was found which is possible be plugged in backwards! Yes I know! We'd had this part of the loop apart to figure out which of the 4 Lamba plugs we were going to use with the new manifold section. Swapped the plugs around and started first time. Just took a lot of problem solving and brain power to get to the bottom of it.

While we had the ECU out and new software flashed onto it a few changes have been made now. Immo Delete, top speed restriction removed which means there no lower Rev limiter if the ABS isn't plugged in or working.

Also adjusting the drivers request map/table for the throttle to improve the throttle response.

Leaving it at that for the time being until it's been driven on the road. Still got to Raise the Rev limiter to 7K - Doesn't sound high compared to the Clio but the standard engine on these starts to run out of puff at 6K but with the changes should make power all the way to 7K now.

Will also adjust the Cam/Vanos tables to improve the mid range torque but want to get some miles driven in it before changing the maps and making too many changes.

42716736525_8e289d9fc0_b.jpg
 

Attachments

  • 42800320114_65c9666118_b.jpg
    42800320114_65c9666118_b.jpg
    120.4 KB · Views: 8
  • 29646080858_c6ab5852b4_b.jpg
    29646080858_c6ab5852b4_b.jpg
    282.8 KB · Views: 8
  • 41812238260_4973bd4cde_b.jpg
    41812238260_4973bd4cde_b.jpg
    124.2 KB · Views: 7
  • 29750650708_1d9649ed62_b.jpg
    29750650708_1d9649ed62_b.jpg
    279.3 KB · Views: 7
  • 29750646948_c76e29c4a4_b.jpg
    29750646948_c76e29c4a4_b.jpg
    171.6 KB · Views: 7
  • 29646080238_66e53f2310_b.jpg
    29646080238_66e53f2310_b.jpg
    256.9 KB · Views: 7
  • 41812239950_6978257a3e_b.jpg
    41812239950_6978257a3e_b.jpg
    164.6 KB · Views: 6
  • 28733050027_88a2080970_b.jpg
    28733050027_88a2080970_b.jpg
    259.2 KB · Views: 6
  • 41812234940_8a50647fe8_b.jpg
    41812234940_8a50647fe8_b.jpg
    126.5 KB · Views: 6
  • 42716736525_8e289d9fc0_b.jpg
    42716736525_8e289d9fc0_b.jpg
    223.4 KB · Views: 5
  • 41709090720_2c9afa1c2b_b.jpg
    41709090720_2c9afa1c2b_b.jpg
    292.7 KB · Views: 6
  • 42716727885_380a93b56d_b.jpg
    42716727885_380a93b56d_b.jpg
    109.7 KB · Views: 6
Great job
If you want best performance from vanos i recommend that you rebuild it with new beisan o rings.
 
Great job
If you want best performance from vanos i recommend that you rebuild it with new beisan o rings.

Yeah it will be done, probably before the map is changed, waiting till the gearbox is removed to do the detents on the gearbox, making it easier to get the timing pin in when doing the vanos service, on the to do list but it isn't right at the top to be done before the first track day.
 
  • Like
Reactions: trackspec197
You dont have to lock timing when removing vanos.
I have done 4-5 vanos services, it is very easy to do. Just remove valve cover and then vanos unit.
There has always been really big difference after vanos seal replacement in low/midrange torque.
 
You dont have to lock timing when removing vanos.
I have done 4-5 vanos services, it is very easy to do. Just remove valve cover and then vanos unit.
There has always been really big difference after vanos seal replacement in low/midrange torque.

Looked into it in a bit more detail this week and the dual vanos on the e46 is much easier to remove and service than the E36 I've messed with in the past which requires the tool to remove the vanos unit. Will find the seal kit and get one ordered and probably do it before the track day.

On a side note. When I bought the car and started talking about Diffs everyone was telling me how long the gears were on the E46. I kept saying I didn't think they were too long and when I roughly calculated it it appeared that the car would top out about 140mph. Little bit more investigation it turns out the car is already fitted with a shorter FD 3.38, Will use that FD when I put a diff in.

Also found the car already has a single mass conversion fitted, could see the flywheel when I removed the sump to do the oil pump.
 
Last edited:
fingers crossed Tom..know how much time you have put into this..hope she will repay you by being a good girl and not breaking down..:thumb:
 
So... I've got a nice 5 week break from work at the moment so time to get my teeth into finishing this before the track day on the 17th at Anglesey.

Once we got back from a weekend of racing at Cadwell, Sadly didn't finish the race due to a shafted gearbox in the Civic. Ripped the Gearbox out of that on the Sunday afternoon in 40 minutes and then ripped the gearbox apart to see what the mess was. But time to focus on building the E46/
First job was to get the car prepped and ready for paint...

42125298510_d7c1a3f32c_b.jpg

Nice and simple gloss black for the whole inside of the car.
43886011302_35c8ba76e9_b.jpg

A friend of mine was going to do it for £500 but I thought it's only got to be the same colour, doesn't have to be perfect as the cage is so tight fitting and will be crawling around inside it putting it all back together so decided to do it myself.

42125299240_e686220758_b.jpg
While waiting for the paint to dry, wanted to give it a few days to fully harden so went into work and started making a few bits for the car. Needed to make some brass slider bushes for the calipers as there's so much flex in the standard calipers. I'm not wasting hundreds of pounds worth of pads when I can make something to solidly mount the calipers.

43934144791_61835a5001_b.jpg
While I was doing to much and fitting new pads I thought it was only fair to get some new Brembo HC disc from GSF on offer at £80 for a pair.

28996924137_ff1161e1ae_b.jpg

All built up with the calipers looking nice and fresh. I did refit the caliper spring after taking the photo but they're not really needed now with the brass sliders in the calipers.
28996925417_d227db0332_b.jpg


Back in with all the glass, wiring and started by fitting the rear section of the roll cage and the rear strut brace.
43886082372_d25d9497ed_b.jpg

Cage fully installed and it was time to put the dash back in...
42125355470_6fe23681b9_b.jpg

Door cards have been chopped to clear the cage door bars. I wanted to leave the top of the door card in place as it looks much neater keeping the door opening handle in place and adding a door pull. This is very much a theme with this car. As much as it's an all out track car it must look right and be built correctly, much like the fitting on the dash below...

28996924817_65d40362d2_b.jpg

Only the top section of the dash has been refitted. with everything else tucked up under it so it's looking tidy.
Kept the centre console as it holds little things like the window switches but spent a while getting it to fit around the RTD shifter so that it's fully visible and functioning.
28996925167_cb4ca924c7_b.jpg

Refitted the carbon trims, heater controller as well as the touch screen tablet in the dash, more to follow on that when I've got a minute. Refitted all dash vents and kept the functional around the cage. Trying to not have that hacked up look that comes with most track cars.
Still got the passenger seat and door bar to fit tomorrow but need to pick up some riv nuts to mount the rear window actuators while I can actually get to the back seat.


Progress with continue tomorrow. At the moment I've been working on the car most days for between 6-10 hours. Until you do it yourself you can't really imagine how much work goes into building something like this.

For those that are interested... I've only spent in the Region of £400 building this after selling everything off from the Clio. I have kept a running total but it's a little bit eye watering to think I only started building this on the 11th June, so not quite at the 8 week mark yet. At the moment I think it was a step in the right direction.
 
Good read Tom, really coming along nicely. Considering the red bits I’m surprised the cage is black. However it does look good in the murdered out black
 
Good read Tom, really coming along nicely. Considering the red bits I’m surprised the cage is black. However it does look good in the murdered out black

Yeah mainly due to the fact I like the subtle look with the BMW’s. Been there and had the bright cage. If I wanted a custom cage it would have been a few months wait. Full price plus the extra for Powdercoat.
Matt black was in the sheld and got it at a very well discounted price next day delivered for me. So went with the black. The red is a little bright so it’s a good job it’s only the underside you see that on.
 
  • Like
Reactions: Big Ben and Beany
Update - Monday - Donnington.
So since the last visit on here a few things have happened. Firstly was the trip down the Donnington to meet up with a group of friends from on here, really funny evening in Donnington town the night before with an Indian with Mr Ghandi. Which has started the forums latest catch phrase of "Hello Big Boy". I'm sure it will pop up on a few forum member videos. I know @jamesgw200 has a great one from the start of the pit lane. It was a great day, caught up with everyone from Spa earlier in the year and managed to get out and do a lot of passenger laps.

I then had to go home and finish off the E46 for the track day at Anglesey on the Thursday of that week.

First Job on the list was to try and sort out the clunking from the rear end... Everything else was pretty much new on the rear end and the diff had a bit of back lash on it so I ordered a replacement, managed to find the same diff I had which was a 3.38 which is shorter than the 2.9 it should have as standard.

43411466724_f347ffb981_b.jpg

That 3.38 diff is taken from an Auto which uses different drive shafts so had to swap the flanges over before fitting to the car.

30262536508_ab468c9c94_b.jpg

Sadly that wasn't to cure the knocking from the rear. I then found some play in the inner CV's so I ordered a pair of driveshafts to take to the track day as spares. Will swap them over before the next track day.

When fitting the rear brake pads I found there was a little bit of run out in the old discs causing some rubbing and binding off the RC5+ pads causing them to knock about in the calipers. Euros has a 50% off so obviously the rear brakes were replaced too.

29192652837_529a140129_b.jpg

All track cars with the interior removed have to have an sunstrip! Obviously. I had a spare knocking around from the Clio so decided to throw that on, will do deeper in the future but for now it will do.

29192652407_5b1dd5d310_b.jpg

Loaded up on the trailer and taken to my local place called MB Tech in Warrington which are really good at alignment. Correctly weighting the car before taking any measurements.

29192653077_9052cd4ca8_b.jpg

All done, I did have to replace the Tie roads and Track rods in the middle of the alignment process but it only took me an hour and the alignment was finished off. Nice and safe alignment with some toe in on the rear, parallel front, 3 degrees front camber and 2 degree rear.

42321362570_732f8a0e37_b.jpg

With that done the final job was to fit the steering wheel boss and steering wheel.

42321362580_da24a24e56_b.jpg

I'd also designed the 3D Printed a gauge holder for the MTX-D Oil Temp and Pressure Gauge I've got in the car.

30262531518_83e37f3585_b.jpg

With all those little jobs done. It was time to get it on the trailer and down to Anglesey for the Track day...
 

Attachments

  • 43411466724_f347ffb981_b.jpg
    43411466724_f347ffb981_b.jpg
    318.8 KB · Views: 9
  • 30262536508_ab468c9c94_b.jpg
    30262536508_ab468c9c94_b.jpg
    303.4 KB · Views: 9
Last edited: